On October 19th, I’ll join Apple’s Developer Tools organization as an engineer. Looking back, I feel like this journey started 10 years ago, although at the time I neither knew that I’d actually end up at Apple, nor how long it would take. This is a summary of my “journey” until now. Maybe it helps someone or is helpful for someone just starting out as an idea how things can go. And if you are looking to work at Apple it might be an inspiration to not be discouraged, just because you didn’t get a response to your application or got a rejection and to just try again.
Disclaimer: Of course, everything in this post is my personal view and experience, your experience may differ (a lot). I’m also writing this before I’ve actually started at Apple, so I have no inside knowlegde of Apple’s hiring process or policy and will only describe my experience and impression as a candidate.
2010: Starting Out With Objective-C and Xcode Development
About 10 years ago, I had just returned from studying abroad in the UK1 and was looking for what I would do for my bachelor’s thesis. I was looking for an advisor for my thesis and a job as a student assistant and found both at the chair for Media Computing and Human-Computer Interaction at my university. I had dabbled with Objective-C a bit before, but my student assistant job was the first time I actually wrote an application for macOS2.
2011: An Xcode Plugin for Call-Graph Navigation
After having worked as a student assistant at the chair, I found a topic for my bachelor’s thesis: A code navigation plugin for Xcode 3. At the time, Xcode had an unofficial and undocumented (iirc) plugin API that was working pretty well. Another student had used it to develop a call-graph navigation tool and I took their project and developed it further and created a new UI representation to see whether it would work better.
2011: My First Application at Apple
I figured doing an internship in the Developer tools group would align very well with my interests and would be a great continuation of my bachelor’s thesis. Of course, this is much easier said than done. Luckily, another student, who was working at the same chair I was writing my bachelor thesis at, had just completed their own internship at Apple and introduced me via email to Matthew Firlik, who was already heading the Developer Tools Group at the time3. So I sent an application to Matthew directly, who then referred me to one of the recruiters. I don’t remember what exactly happened afterwards and wasn’t able to find all the emails anymore to piece it together, but long story short: It fizzled out. I believe I had contact to a recruiter, but it didn’t lead anywhere, but I also didn’t get a clear rejection either.
2012 - 2016: More Applications
Sadly, this is representative of my general experience with applying at Apple: If you manage to get hold4 of one of the actual engineers/managers in the team or organization you want to work at, they are usually very nice and helpful. They’ll answer questions and offer to forward your resume to the hiring manager or submit it to the internal referal system. But then you are basically stuck at the top of the funnel with all applicants again and there is only a slim chance you’ll make it to any of the interesting steps like a phone interview and most of the time you’ll simply hear nothing about your application, even if you sent it to an actual human via email. Once they’ve entered your resume into the pipeline, they also don’t know what the status is and won’t be able to give you feedback about it, until the resume comes across their desk again for setting up a phone interview.
The only time this is different is if you manage to contact the hiring manager for the position directly and you somehow convince them that you are such an interesting candidate that they should set up a call with you directly without going through the recruiter and basically take the recruiting process into their own hands5. But of course, this will rarely happen. After all, each position at Apple likely gets hundreds of applicants and there is a reason the hiring managers work with a recruiter: It’s a lot of work to manage all the applicants and their state in the process and the hiring managers still have other work to do.
For one application, I had actually talked to the hiring manager via Twitter DM, sent them my resume via mail and they then sent it on to the recruiter to be considered. After not getting any feedback regarding the status of my application, I checked in with the hiring manager a month later. They told me I was still in the “waiting to be reviewed” state, but they didn’t have more details. Three months later, I saw them post the same position again and checked in again. They apologized that they didn’t know what happened to my original application, as they are “at the very end of the firehose” of applications and as such don’t have good visibility of the state of every single application. As I said above: Individually, most people are nice and try to help, but even the hiring managers don’t necessarily have a good overview of all applications for a position as that’s the recruiters job.
And while it’s basically the job of the recruiters to keep track of all the applicants and make sure they are all considered, they usually manage more than one position at a time in parallel, which means they’ll likley deal with thousands of applications at any given point in time. And from what I’ve heard Apple’s internal HR/recruiting software is just as good as everybody else’s, which is: not very good. If you work at a large-ish company, think of the last time you had to plan your vacation days and the software you had to use to do so: This is what candidate management systems are like and recruiters have to deal with them all day.
It’s very frustrating to get “lost in the pile”, but it’s likely to happen, even if you had a direct contact to someone from the team or the hiring manager or got a referral. And if you applied just via uploading your resume via jobs.apple.com for a specific position there is a good chance no one apart from a recruiter will ever look at your resume.
After my first application for an internship, I applied again for a set of positions after I finished university in 2013, this time full-time and applying by uploading my resume via jobs.apple.com. For those, I don’t think I ever got a reply apart from the automated system email “Thanks for your interest in Apple” confirming my submission. After that I got into a habit of checking jobs.apple.com every one or two years for interesting positions and applying to them. But nothing ever came of it until 2017.
2013: Joining a Small Agency
As the Apple applications didn’t work out, I joined a small agency after getting my master’s degree in Computer Science. We worked on mobile apps (mainly iOS in my case) for businesses, with a focus on internal use-cases. I was able to work with clients directly and enjoyed using the newest technologies due to basically starting a new project every couple of months.
2015: Joining XING
While I enjoyed my time at my first job, my main issue there was that I didn’t have any other iOS developers as colleagues, so I felt limited in learning more about iOS development. This is why I started to look for a job in 2015 and ended up at XING. For those of you who haven’t lived in Germany: XING is basically Germany’s equivalent of LinkedIn and has one of the largest iOS teams in Germany. I worked on the team that was responsible for some of the “premium” features of the app and maintained the “Upsell” flow, which was used to sell subscriptions to users6.
2017: My First Actual Apple Interview
In 2017, I once again applied for a set of positions. I found some old confirmation emails from back then and here is the (potentially incomplete) list of positions I applied for7:
- Authoring Tools Engineer (Swift)
- Contacts Frameworks Software Engineer
- Design Tools Engineer
- iOS Application Engineer
- iOS Developer for Maps Transit
- Mail UI Engineer
- Privacy Engineer
- Swift iOS App Developer
- User Experience Prototype Engineer
- User Experience Application Engineer
- Documentation Frameworks Engineer
- Design Tools Engineer
- Playgrounds Engineer
A couple of those I found via Apple engineers/managers posting them on Twitter and contacted them this way. For a couple others friends at Apple referred me. For some I simply uploaded my resume. And this time I actually got an invitation for an initial phone interview for a single one out of those 13 applications, specifically for the “Documentation Frameworks Engineer”.
It was mostly a “getting to know each other” phone interview with the hiring manager. I felt it went reasonably well, but after the call I got feedback from the hiring manager that I wouldn’t be a good fit for that position, but that they had a good impression of me and would like to recommend me for another position within the Developer Tools group: Interface Builder Engineer8. I excitedly agreed, as Interface Builder was and is one of my favorite parts of Xcode and I also felt like this was a better fit. And this is how I ended up with my second initial phone interview.
The phone interview for the Interface Builder position also went well, according to my impression. I had a nice chat with one of the engineers from the team, as the manager couldn’t make it. After the call, I got the usual “the recruiter will be in touch with next steps” feedback. But I never heard of the recruiter. I reached out to the recruiter one or two weeks later, but didn’t get a response. After reaching out to them a couple more times over the following weeks but never getting any response, I gave up. To this day, I don’t know whether I didn’t pass the initial interview and just didn’t get a response, whether the recruiter maybe left Apple, or whether my mails somehow simply got lost in the candidate management system. So again, this application fizzled out.
This was even more frustrating than my first application, as I had made it at least to a phone call and talked to an actual human. But having done a couple more interviews with Apple since then, I can at least say: This not representative. Normally, when you made it to a phone call, you’ll get some feedback. I did so for the previous interview and again for all interviews I had with Apple since then.
2018: Joining Yelp
As Apple didn’t work out I looked for my other options and ended up joining Yelp. At both XING and Yelp I felt like I learned a lot less about iOS development than I expected and a lot more about all the everyday challenges of software development in large teams, like estimations, communication, figuring out what your predecessor did, not building the same feature twice in different teams, etc.
At Yelp, I was working in a lot of different teams. I started out working on a team that was generally responsible for the Yelp Business Owner app. Later, I joined an infrastructure team, responsible for the networking side of both the mobile apps and the backend. We maintained the networking libraries on both sides (app + server), discussed how to transition our infrastructure to GraphQL, etc. For internal reasons, this specific team got dissolved and I ended up briefly working on a team responsible for the login and business claim flow in the Yelp Business Owner app. Before I left, I worked as a Python backend developer on a team responsible for some of the internal admin tools Yelp’s customer support is using.
2020: A Surprisingly Good Year (for me 😬)
While I was reasonably happy at Yelp, I continued applying for jobs at Apple from time to time, as I still wanted to get back to work on Developer Tools, ideally at Apple. Again, I found a couple of positions to apply for and this time I actually got a response for two of them:
- Software Engineer, iWork Charts
- Performance Tools Engineer
For the iWork Charts position, I had an initial phone interview, which went well, followed by a technical phone interview. For this one, I was asked to solve a relatively easy array-based programming question9 that I struggled to find an efficient solution for. I had not practiced any of these types of “coding challenges” as I figured I’d either get a real-world like task or it would be more of a technical conversation instead of Leetcode-style challenges.
Maybe due to that, maybe due to other reasons I got a rejection for the iWork Charts position after the technical phone interview. But even though the result obviously wasn’t what I wanted, this felt like a nice process. I enjoyed both the initial chat with the hiring manager and the technical phone interview and it only took two business days from the technical phone interview to the final response.
Luckily, at the time I got the rejection for the iWork Charts position, I had already started a conversation with the hiring manager of the Performance Tools Engineer position. We had a similar initial phone call as the one for the previous positions and afterwards agreed to schedule a technical phone interview. The phone interview was again about a coding challenge using CoderPad, but this time it felt less like an artifical Leetcode-style question and closer to reality. It was still rather artificial, as I was asked to implement some string transformation using the raw bytes of a string without using the already existing Swift standard library function for the same transformation, but it felt like it was more about getting to a correct solution and less about finding the optimal one. Also, it was simply easier for me, personally, as the hard part was understanding the unicode structure of a string and I was already familiar with that.
After passing the the technical phone interview, we scheduled a “virtual onsite”. This is the part where you’d usually fly over to the US, but due to COVID-19 we simply did all of it via video calls. In my case, it was basically a full day of interviews with 4 technical interviews (each 50 minutes) followed by 3 “manager” interviews (each 30 minutes) with the hiring manager, the Sr. Engineering Manager and the Sr. Director of Engineering. After my experience with the technical phone screens, I expected the 4 technical interviews to be basically 4 different coding challenges, but that wasn’t the case at all. Only one of them had a Leetcode-style task to solve (this time about traversing binary trees), but the other three were really just technical conversations, that I thoroughly enjoyed. Among other things, we talked about implementation details of the prototype I built during my master thesis, how debuggers and breakpoints work under the hood, the UI design of instruments, how to find retain cycles in memory and display them and how to heuristically determine what the “start” of the retain cycle is, etc. I want to emphasize that I didn’t actually know all of this in detail, e.g. I didn’t know how one would implement a debugger. But I had enough of a general idea of how things work to ask the right questions or come up with a reasonable theory to discuss.
From what I can tell, every organization or maybe even every team at Apple does hiring in their own way. Some teams seem to use Leetcode-style questions. Some do coding challenges. Some simply have technical conversations or ask some technical questions to test you. Some use brain-teasers. While both technical phone interviews used CoderPad, one used the integrated CoderPad video chat functionality while the other used FaceTime for Audio + Video. Most initial calls where done via FaceTime, but some managers called with audio-only, others used FaceTime video. Recruiters tended to go with audio-only. I had 4 technical interviews and 3 manager interviews as part of the virtual onsite, while a friend of mine who applied to a different org had only 3 technical interviews + 1 manager interview. My technical interviews were all independent of each other while my friend’s technical interviews where connected and all about the same example app they had to develop beforehand. Overall, there seems to be a lot of variety, which is yet another reason not to give up because one specific team rejected you one time. Maybe you fail the interview-style of one team, like I did, but succeed with another.
After the virtual onsite it took another 2 business days until I got feedback. At that point it was simply a “we want to hire you” without any more details. At that point in time, we hadn’t yet discussed when I would start or talked about salary10 at all. This all happened afterwards. From the initial contact via mail to “we want to hire you” it took ~2 months. Then it took another month to iron out the details regarding salary, get formalities like visa status, background check etc. out of the way until I got a first contract and then another month to agree on a final contract because there was some back and forth about some parts of the contract that I wanted to get changed.
Becoming a Performance Tools Engineer
Long story short: On October 19th I’ll join Apple as a Performance Tools Engineer. Afaik, my future team works on Instruments, Xcode’s Memory Graph Debugger and a couple of command line tools like atos, heap, leaks, etc. And probably a couple of things that I soon won’t be able to talk about anymore. I’m excited to help drive all of these tools forward and if you have suggestions or a wishlist, feel free to reach out, but I obviously won’t be able to make any promises and I don’t even know whether I’ll be able to reply. Even if I won’t be able to speak as freely about Apple’s tools, I’m hoping I’ll still be able to keep an open ear for the Apple developer community.
A Couple of Stats
- Time from first application to actual job offer: ~9 years
- Time from first application to first phone interview: ~6 years
- Time from first contact for a position to getting a signed contract: ~4 month
- Positions at Apple I applied for over the years: >50
- People I got to know over the years at Apple who referred me via their internal system: ~5
- Times a recruiter/sourcer reached out to me based on the profile I had saved on jobs.apple.com: 1
- And my profile actually fit what they were looking for: 0
- Positions I had a least an initial phone interview for: 4
- Positions I got a final feedback (accepted/rejected) for after the application online/via email/referral: 3
- Times after I was rejected that I got a referral by the rejecting hiring manager/recruiter to another/better-fitting position: 1
- Offers: 1
So Long
This will probably be my last blogpost for a while. Both because I historically didn’t find a lot of time writing here and because writing about Apple-related software development as an Apple engineer is rather difficult. But I’ll see how it goes. 🙂
-
I grew up and still live in Germany. ↩
-
At the time it was still called Mac OS X. ↩
-
If you’ve watched some of the more recent WWDCs you’ll have seen him present a section of the Keynote or the Platform State of the Union. ↩
-
Please be considerate of everyone’s time here. If you actually have a friend at Apple: Great, feel free to ask them about positions, refer you, or whatever, you hopefully know best what level of request your friendship tolerates. If an engineer or hiring manager posted a position on their team on Twitter and offered to answer questions or forward resumes for that position: Great contact them on the channel they asked for, but don’t expect them to do more than forwarding your resume as support for your application, they won’t be able to vouch for you if they don’t know you and they’ll probably get hundreds of requests. And if you find an Apple engineer on Twitter or elsewhere that happens to work on the team your are interested in, but hasn’t made it clear they want to help people interested in joining Apple, respect that. At most, ask them politely whether they could help by forwarding your resume and if they say no or don’t respond accept that. Definitely don’t hunt for people’s work email addresses to ask them to do something for you (e.g. refer you).11 ↩
-
And there are good reasons not to do that, even if they are convinced you are a good fit, among others that this will probably introduce a lot of biases. ↩
-
This is not a resume, so I’ll refrain from making claims like “I increased x number by y percent”. I don’t need to convince you to hire me, I’ve got a job already, this is mainly to give you an idea of what I worked on. If you want to know more, feel free to ask. ↩
-
I chose them based on what sounded interesting to me. In my case that meant: Developer tools, productivity software, frameworks, and UX- and privacy-related stuff. No games; no computer vision, AR or otherwise “graphics-heavy” stuff; no machine learning. ↩
-
I don’t remember whether this was the actual name of the position, but it was similar. ↩
-
I will not reveal the detailed questions used here. You will probably find similar questions on Leetcode or whatever other interview training platform or book you use. ↩
-
I’m not willing to post my compensation details online, as I feel like I don’t know what potential negative effects that might have. However, if we know each other or have met, feel free to ask, I think compensation details should be shared more freely to combat the information asymmetry between employees and employers. ↩
-
Of course, all of this is my opinion what you should and shouldn’t do, there isn’t a clear ruleset or anything like that. General courtesy applies, use your best judgement. ↩
Note: This was written shortly before WWDC 2020, but you might only read it afterwards. So anything in here is already available, you don’t need to download the beta for it or wait until autumn to use it. I’ll update this if anything relevant to this article comes out from WWDC.
Most of you have probably worked with an app or are currently working with an app for which a significant part of the functionality relies on talking to a server via HTTP. When something doesn’t work as expected or you simply want to understand an area of the code you are unfamiliar with, it’s often useful to look at the HTTP calls going back and forth between the server. What kind of calls are made? What exactly is the server sending? To do so, you are likely use a tool like Charles Proxy or Wireshark.
However, these tools are often rather complex to use and especially to set up. They may require you to set up a custom SSL certificate and jump through multiple hoops to make the device trust it. They also show a lot of information you might not actually need to understand your application. At the same time, it’s hard to cross-reference them with whatever else is going on in your application. So what if I told you that instruments could actually do a lot of that work as well, with a little help from you and could display it in a manner that’s much better suited to what your application is actually doing?
As preparation for WWDC next week1, I’ve been (re)watching a couple of talks from previous WWDCs. Somehow, I had completely missed that the core of Instruments had been rewritten to unify the instruments and make it much easier to build custom instruments for Xcode 10. Also, WWDC 2019 had a great introduction to instruments, something I’ve been missing for years.
Ok, cool, so you can now write custom instruments to measure things Instruments might not ordinarily measure. But what can you measure and how easy is it? “Pretty much anything” and “medium difficulty, little time effort”, I’d say. Generally, you can do most things you need by writing an XML file that specifies how to translate signposts from your code into data to display in instruments and the XML you write is not particularly complex. The main hurdle is that the “code” you write will likely be quite different from what you are used to, there are only very few examples to follow, the documentation only gives a high-level overview of how to do it and while Xcode actually validates the XML file pretty strictly there is little help of how to fix an issue and no autocompletion. But with a bit of time you can find the pieces you need, and if you have an example to adapt you can actually make progress rather quickly. So I’m going to give you such an example and try to list all the useful links as well.
But let’s start at the beginning: I want anyone of you who has used Charles or Wireshark before to debug your app, or who has an app that makes a lot of HTTP requests, to build an HTTP tracing instrument custom for your app or at least framework. It will look like this:

It took me about a day to get this prototype up and running (after watching the relevant WWDC videos). If you don’t care about the rest and just want to see the code, it’s here.
Overview
What we are doing here, and what’s the easiest way to get a custom instrument, is to use os_signpost. You use it to log .events or .begin and .end signposts. You then configure a custom instrument to parse these os_signpost intervalls and extract the extra values you logged to it to configure how to display them in a graph, how to group them, which ones to filter out and how to configure lists and tree/outline views in the detailed pane of Instruments.
We want to build an instrument that displays all HTTP requests that go through our networking library as intervalls (start + end), so we can see how long they take and cross-reference them with other things going on in our app. In this blog post, I’m using Alamofire as the Networking library to instrument and Wordpress as the app to profile, simply because both are open source. But you should be easily able to adapt all the code to your networking library.
Step 0: Familiarize Yourself With the Instruments App
- Getting Started with Instruments (Session 411 from WWDC 2019) is a really good overview of instruments, at least watch the “Orientation” part to get familiar with the terminology, like instruments, tracks, lanes, traces, templates, detail view, etc.
- Watch Creating Custom Instruments (Session 410 from WWDC 2018) to get an idea of what we are doing. If you are impatient, it’s enough to watch the “Architecture” (for additional details how Instruments works and what you are actually configuring) and the “Intermediate” part. Don’t expect to understand every detail while watching it, it’s a lot of stuff in one session and they don’t explain every detail due to time limitations. I had to watch it multiple times and find additional documentation before I actually managed to get my instrument working in the way I wanted. However, I’m trying to fill in the gaps below.
Step 1: Log the Data You Need to Signposts
We want to build a signposts-based instrument, so we need to log our data via signposts. Alamofire sends Notifications whenever a request starts or completes, so all we need is something like this2:
NotificationCenter.default.addObserver(forName: Notification.Name.Task.DidResume, object: nil, queue: nil) { (notification) in
    guard let task = notification.userInfo?[Notification.Key.Task] as? URLSessionTask,
        let request = task.originalRequest,
        let url = request.url else {
            return
    }
    let signpostId = OSSignpostID(log: networking, object: task)
    os_signpost(.begin, log: SignpostLog.networking, name: "Request", signpostID: signpostId, "Request Method %{public}@ to host: %{public}@, path: %@, parameters: %@", request.httpMethod ?? "", url.host ?? "Unknown", url.path, url.query ?? "")
}NotificationCenter.default.addObserver(forName: Notification.Name.Task.DidComplete, object: nil, queue: nil) { (notification) in
guard let task = notification.userInfo?[Notification.Key.Task] as? URLSessionTask else { return }
let signpostId = OSSignpostID(log: networking, object: task)
let statusCode = (task.response as? HTTPURLResponse)?.statusCode ?? 0
os_signpost(.end, log: SignpostLog.networking, name: "Request", signpostID: signpostId, "Status: %@, Bytes Received: %llu, error: %d, statusCode: %d", "Completed", task.countOfBytesReceived, task.error == nil ? 0 : 1, statusCode)
}When the requests starts, we log a .begin signpost, when it completes, we add an .end signpost. The signpostId is used to match an end call with a corresponding begin call, to make sure we close the correct interval, if multiple requests are happening in parallel. Ideally, we would store the signpostId on the request object, to make sure we use the same one for .begin and .end. However, I didn’t want to modify the Request type in Alamofire, so a workaround is to use OSSignpostID(log:, object:) and pass an identifier object to it. We use the underlying URLSessionTask object here as this will hopefully be the same in both cases. And with the object being the same, OSSignpostID(log:, object:) will return us the same id when calling it multiple times.
We log data via a format string. You probably want to make sure, to always separate two arguments with some fixed string in-between to make it easier to parse on the instrument-side and also make the parsing easier to understand. Note that you don’t need to log data in the .end call if you’ve already logged it in the .begin call. Both will be combined to one interval and you’ll have acces to all of them.
Step 2: Create a new custom instruments Xcode project.
Follow the steps in Creating Custom Instruments (Session 410 from WWDC 2018) or in the Instruments app help - Create an Instruments Package project to create a new Instruments Package project in Xcode. This will give you a basic Xcode project with a .instrpkg file. You’ll specify all the details there.
Step 3. Do all the rest 😆
Basically, you’ll follow the steps outlined in the Instruments app help - Create an instrument based on signpost data. While all the steps in there are correct, they are lacking a lot of detail, so it’s good to have an example of an actual custom instrument. Take a look at mine here. You’ll basically need these parts:
A Schema
This tells instruments how to parse the data from your signposts into variables you can use. You define a pattern that extracts variables from your logged messages and assign those to columns.
<os-signpost-interval-schema>
	<id>org-alamofire-networking-schema</id>
	<title>Alamofire Networking Schema</title>

	<subsystem>"org.alamofire"</subsystem>
	<category>"networking"</category>
	<name>"Request"</name>

	<start-pattern>
	    <message>"Request Method " ?http-method " to host: " ?host ", path: " ?url-path ", parameters: " ?query-parameters</message>
	</start-pattern>
	<end-pattern>
	    <message>"Status: " ?completion-status ", Bytes Received: " ?bytes-received ", error: " ?errored ", statusCode: " ?http-status-code</message>
	</end-pattern>

	<column>
	    <mnemonic>column-http-method</mnemonic>
	    <title>HTTP Method</title>
	    <type>string</type>
	    <expression>?http-method</expression>
	</column>
	<!-- and lots more columns like that -->
</os-signpost-interval-schema>
The mnemonic is the identifier of the column that you use to refer to it later on. I somehow felt weird naming the columns the same as the variables, so I prefixed them with column. But from what I can tell there is no need to do that.
An Instrument
An Instrument consists of the basic definition:
<instrument>
    <id>org.alamofire.networking.instrument</id>
    <title>Alamofire</title>
    <category>Behavior</category>
    <purpose>Trace HTTP calls made via Alamofire, grouped by method, host, path, etc.</purpose>
    <icon>Network</icon>

    <create-table>
        <id>alamofire-requests</id>
        <schema-ref>org-alamofire-networking-schema</schema-ref>
    </create-table>

    <!-- rest of the instrument definition -->
</instrument>
This is fairly basic stuff. Most of these fields are free-form text or refer to stuff you defined previously (schema-ref). But category and icon can only have a small set of values defined here and here.
A Graph Inside an Instrument
A graph defines the, well, graphing part of the instruments UI, the visual representation you see in the track area. It looks roughly like this:
<instrument>
    <!-- Basic instrument definition -->
    <graph>
        <title>HTTP Requests</title>
        <lane>
            <title>the Requests</title>
            <table-ref>alamofire-requests</table-ref>

            <plot-template>
                <instance-by>column-host</instance-by>
                <label-format>%s</label-format>
                <value-from>column-url-path</value-from>
                <color-from>column-response</color-from>
                <label-from>column-url-path</label-from>
            </plot-template>
        </lane>
    </graph>
    <!-- other parts of the instrument -->
</instrument>
You can have different lanes and you can use a plot-template to have a dynamic number of plots in a lane. My example also contains an example for a simple plot. I’m not really sure why both graph and lane have a title. In addition to that, each plot in a plot-template also gets a label from label-format 🤷.
A List, Aggregation, Or Something Else for the Detail View
With just a graph, Instruments would look somewhat empty. You want to display something in the detail view as well. You do so by using a list, aggregation, or narrative. Maybe more, that I haven’t figured out, yet.
An aggregation looks something like this:
<instrument>
    <!-- Basic instrument definition -->
    <aggregation>
        <title>Summary: Completed Requests</title>
        <table-ref>alamofire-requests</table-ref>
        <slice>
                <column>column-completion-status</column>
                <equals><string>Completed</string></equals>
        </slice>
        <hierarchy>
            <level>
                <column>column-host</column>
            </level>
            <level>
                <column>column-url-path</column>
            </level>
        </hierarchy>

        <column><count/></column>
        <column><average>duration</average></column>
        <column><max>duration</max></column>
        <column><sum>column-size</sum></column>
        <column><average>column-size</average></column>
    </aggregation>
    <!-- other parts of the instrument -->
</instrument>
a list looks like this:
<instrument>
    <!-- Basic instrument definition -->
    <list>
        <title>List: Requests</title>
        <table-ref>alamofire-requests</table-ref>
        <column>start</column>
        <column>duration</column>
        <column>column-host</column>
        <!-- Lots more columns -->
    </list>
    <!-- other parts of the instrument -->
</instrument>
Bonus Material
With this, you are basically done 🤷. However, you also haven’t done much more than described in the WWDC video and I promised to fill in some gaps.
My example instrument constains a couple more nice things.
- A small CLIPS expression so the interval is colored based on whether the request was successful or not. You can find valid color values in the Instruments Engineering Type Reference.
- With the plot template, you can draw multiple plots in one lane, and e.g. have one plot per host as in my example. However, you can have more than one level of hierarchy and can allow the user to expand or collapse the details. To do so, you’ll need to use the
<engineering-type-track>element to specify your hierarchy and then add augmentations for the different hierarchy levels to add graphs and detail views. Also, don’t forget to activate your augmentation inside the relevant instrument.
How to Go Further
If you haven’t seen it from the links before, there is actually a complete reference, for all the stuff you can put into the .instrpkg file. E.g., it will tell you, which elements are valid inside an <instrument>-element or from which icons you can choose for your instrument. One gotcha: Order actually matters. So, e.g. in an <instrument>, <title> must appear first, then <category>, the other way round is invalid.
Watch Creating Custom Instruments (Session 410 from WWDC 2018) again and look out for the parts that you need. There is also example code from a WWDC 2019 session, which is where I found the usage example for <engineering-type-track>.
CLIPS is the language used to write custom modelers (not covered here), but can also be used for short expressions during the column declaration. The documentation about the language has much more than you need. The main thing you probably need to know to write expressions for yourself: CLIPS uses prefix notation, so instead of ?a + ?b you’d have to write (+ ?a ?b).
Other Posts About Custom Instruments
- Igor about Building custom Xcode Instruments Package
Debugging
It’s a good idea to always add the os_signpost instrument to your trace document as well. This way, if something doesn’t work as expected, you can also check whether your data wasn’t logged correctly, or your instrument didn’t interpret it correctly.
What I Haven’t Figured Out Yet
- How to use values that Instruments gives you out of the box and displays in the UI (e.g. the duration) in expressions for column definitions (e.g. to make a transfer rate column by dividing the bytes-received by the duration).
- How to display anything in the extra detail area. It feels like it’s only for call stacks. I’d love to display e.g. a JSON body of a selected request there, but haven’t found any example that actually populates it.
What This Instrument Can Do
Work in Progress
For now, download it and just try it out.
-
Ok, and some other reasons. 😉 ↩
-
The full code for logging in my example is in the
Logger.swiftfile. It’s targeted at Alamofire 4.8 because that’s what the current version of the Wordpress iOS app is using, even though at the time of writing, Alamofire 5 is already out. Due to the notifications, it’s easy to add this logging code without modifying Alamofire itself, however if you have a custom networking library it might be easier to add the logging to the library itself to get access to more details. ↩
Often I see code like this:
class MyViewController : UIViewController {
    override func viewDidLoad() {
        // [...]
        let button = UIBarButtonItem(barButtonSystemItem: .cancel,
                                     target: self,
                                     action: #selector(didTapCancelButton(sender:)))
    }

    @IBAction func didTapCancelButton(sender:Any) {
        // cancel
    }
}
And I really don’t like it. The part that I don’t like is the name of the action-method. More specifically, the didTap-part. It might as well be didTapSaveButton or didHitSend. Or cancelButtonTapped. All of those feel wrong™ to me. There are two main reasons for that:
Target-Action is a Command Pattern, not a Delegate Pattern
Deep in Apple’s Developer Documentation, hidden in the “Guides and Sample Code”, you can find an article explaining the Model-View-Controller (MVC) pattern. 1 They explain that the original MVC-pattern is made up of the Composite, Strategy and Observer patterns and go on to explain that their version of MVC uses two additional patterns: the Mediator and the Command pattern. Target-Action is the Command Pattern part of Apple’s MVC.
In the Target-Action version of the Command pattern, the UI element (e.g. a button) is the invoker, the action/message passed to/method called on the object is the command and the target is the receiver. Now, a command should be something like undo, deleteBackward, lowercaseWord, or scrollToEndOfDocument. Those are all actions an NSResponder understands and might (depending on the specific instance and other circumstances) react to. WKWebView has reload among others. UIResponder is a little smaller but still has the classics: cut, copy, paste, selectAll() and of course toggleBoldface, toggleItalics, and toggleUnderline. What did you think how the overlay menu you get for a text-selection works?
So Apple definitely calls their actions like commands, which seems like a good example to follow. In contrast, calling your action didTapXButton sounds like a delegate method. But we are not using a delegate pattern here. We don’t expect a call from some very specific source asking as for specific information like in a delegate pattern. Instead we get a command to interpret and execute. And this command may or may not be invoked. Or may be invoked multiple times. By different senders, we don’t even know who will be triggering the action.
We don’t know the sender at compile-time and the sender shouldn’t be relevant
An IBAction can be invoked from any kind of control2. Your didTapSendButton could be triggered when the user hits the return key on the keyboard after entering text in the message field. In a macOS app, I might trigger the sending of the mail from a menu item. Or maybe I tapped on a button in the TouchBar and not the one in your window. Or maybe by a triple tap gesture recognizer. It doesn’t matter, the intention of the user is clear, they want to “send” whatever they were writing.
By adding the name of the UI element to the method name, you couple the controller to the view more closely than necessary. And should you ever need to know how the user invoked the action, e.g. because you want to track whether anyone really uses the TouchBar, you can still look at the sender property and do some customization3. That’s what it’s for. But adding some customization for special cases and otherwise keeping your action-method generic makes it much more flexible to be triggered from UI elements you might not even have heard of when you initially wrote the code.
Except for some very specific commands, it shouldn’t matter from where you action is invoked. lowercaseWord means “make the currently selected word lowercase”. copy means store the currently selected data (text, image, whatever) in the clipboard. selectAll means “select everything I can see here”, whatever that everything is. And undo means “I changed my mind, please roll back.”
Name Your Actions Like Commands
So Apple names their methods in this way, it fits the pattern and it decouples our controllers from our views. What’s not to like?
Thus, we should name our actions like commands. Make it cancel(sender:Any), save(sender:Any) and sendMessage(sender:Any) instead of didTapCancelButton(sender:Any), saveButtonTapped(sender:Any) and didHitSend(sender:Any)4.
And by the way, it doesn’t matter whether you actually use Interface Builder or not. As long as you assign targets and actions to UI elements your action-methods should follow this naming pattern. I would even recommend to add @IBAction in front of them, as it’s a nice marker to indicate to other programmers that this will be invoked from UI elements and they might not have full control over when and how and should thus not assume anything more than is provided by the action name.
-
I highly recommend reading it, independent of this blog post. ↩
-
And should you ever want to make your action only be invokeable by buttons, still name it in a generic way but make the type of sender e.g.
UIButton. It doesn’t help when you specify the action programatically, but Interface Builder will respect your choice and only offer it to be triggered by elements that fit that type. Yet another great reason to use Interface Builder. ;-) ↩ -
Did you know that you can add more than one action to a
UIControl(sadly not toNSControl, thanks to Mark Aufflick for pointing that out)? So instead of customizing thesendaction and adding your tracking there, just make the TouchBar element invoke the normalsendaction and add another actiontrackTouchBarUsewith yourTrackingControlleras target. They will both be invoked when the user taps the TouchBar item. This way your view controller neither needs to know about tracking nor about how many different ways there are to invokesendand you can simply configure the actions in Interface Builder. 🤯 ↩ -
macOS makes this much clearer.
NSWindow,NSDocumentand friends all have lots of great action-methods. This is why you can so often build pretty advanced macOS applications by just combining some instances of Cocoa classes in Interface Builder and configuring them. Sadly, UIDocument and it’s friends have forgotten most of that, but I think following this naming pattern still fits well with Cocoa Touch and has all of the advantages described above. ↩
Recently, I worked on implementing OAuth 2 authentication using just plain NSURLSession APIs. While I came to really like Apple’s authentication API for HTTP Basic authentication in the past, I was really disappointed with it when trying to use it for OAuth 2.
The Problem
OAuth 2 generally works like this:
- You use some initial authentication method (e.g. web login or username & password) to obtain a refresh token and an access token.
- You add the access token to the
Authorizationheader of every request that needs authentication. The value of this header field looks roughly like this:Bearer my_access_token. - The access token has a very short life-time, usually between a few minutes and a few hours. When it expires, the request fails with a HTTP 401 status code and the header field
WWW-Authenticatewill be set to something likeBearer realm:additional_info. TheBearerpart is basically the identifier for OAuth 21. - The client then needs to use the refresh token from step 1 to obtain a new access token from the authorization server.
- It then retries the original request with the new access token.
More generally, most authentication flows work as describe in this graphic:
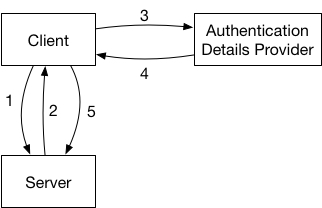
- The client makes a request to the server.
- The request fails because the client did not provide authentication details or the ones provided were invalid.
- The client talks to some kind of authentication details provider to get new authentication details. In the case of OAuth 2 this is the authentication server that provides new access tokens. But it could just as well simply be the user that the application asks for their username and password in the case of HTTP Basic authentication or a lookup in the local keychain.
- The authentication provider provides new details. Be that the response from a server, or the input from a dialog shown to the user.
- The client uses these new authentication details, adapts the original request to include these details and retries the request.
How To
To implement authentication flows like this, the NSURLSessionDelegate has a really useful method called: URLSession:task:didReceiveChallenge:completionHandler: where the completionHandler has the following type: void (^)(NSURLSessionAuthChallengeDisposition disposition, NSURLCredential *credential).
This is basically exactly what you want. According to the documentation:
The URL loading system classes do not call their delegates to handle request challenges unless the server response contains a WWW-Authenticate header.
Calling the delegate method when the WWW-Authenticate header is set is exactly what we want.
You can then fetch the required credential and call the completion block when you are done to hand the new credentials to the URL loading system and it will retry the request automatically, without you having to do anything. This is especially valuable, as there is no other way to retry an NSURLSessionTask, all you can do if you are not relying on this method is create a new task once the original one failed.
Except there are two things missing:
-
The delegate method is not actually called whenever the
WWW-Authenticateis set. It’s only called if theWWW-Authenticatespecifies HTTP-Basic2 Authorization, so only when its value is something likeBasic Realm=.... This means it will not be called for OAuth (2). -
The completion block also only supports HTTP Basic authorization. The only thing you can hand to the completion block is a
URLCredentialobject. But aURLCredentialalways consists of ausernameandpassword, there is notokenproperty or similar. And the username and password will always be encoded as HTTP Basic Authorization header, there is no way to influence how whatever you put inusernameandpasswordgets encoded into the header of the retried request. In fact, there is no way to modify the request to retry at all. There is just no way to access it3.
In summary, almost all the pieces are there to have a nice and simple way to implement OAuth following all the patterns in the URL Loading system, except that the conditions when the delegate method is called and the completionBlock parameters are too limited. 🤦♂️
My Wish
All we would need is a slightly more flexible way to configure the retried response. It would even be enough to only be able to provide a value for the authorization header. Similar to the problems above we only need two things:
- Call
URLSession:task:didReceiveChallenge:completionHandler:on every response that contains aWWW-Authenticateheader, not just for HTTP Basic Auhorization. - Make the
completionBlockaccept a protocol instead of theURLCredentialdirectly, like so:
protocol AuthorizationValueProviding {
    func authorizationHeaderValue() -> String
}

protocol URLSessionTaskDelegate {
    // adapted version of existing method, note the changed completionBlock
    optional func urlSession(_ session: URLSession, task: URLSessionTask, didReceive challenge: URLAuthenticationChallenge, completionHandler: @escaping (URLSession.AuthChallengeDisposition, AuthorizationValueProviding?) -> Void);
}
And URLCredential could just implement that protocol with a default HTTP Basic handling
extension URLCredential : AuthorizationValueProviding {
    func authorizationHeaderValue() -> String {
        // HTTP Basic encoding of username and password. See https://tools.ietf.org/html/rfc7617#section-2
        let authorizationData = (user + ":" + password).data(using: .utf8)?.base64EncodedString()
        return "Basic \(authorizationData)"
    }
}
This way you could still pass a simple URLCredential object to the same completionBlock and keep backwards compatibility4.
And you could even make String implement it by default if you liked:
extension String : AuthorizationValueProviding {
    func authorizationHeaderValue() -> String {
        return  self
    }
}
and then use that to implement an OAuth callback like so:
optional func urlSession(_ session: URLSession, task: URLSessionTask, didReceive challenge: URLAuthenticationChallenge, completionHandler: @escaping (URLSession.AuthChallengeDisposition, AuthorizationValueProviding?) -> Void) {
        refreshAccessToken() { newAccessToken:String in
            completionHandler(.useCredential, "Bearer \(newAccessToken)")
        }
    }
}
Can I please have that, Apple? It’s Christmas soon, right?
I filed a bugreport with Apple, if you agree, please duplicate it. If there are other ideas how to do this, please let me know.
-
Of course, it’s more complicated than that. There are different token types and different authentication schemes within OAuth. But it’s a good enough approximation, and at least in the case I tried I couldn’t find a better way to identify whether a server is actually asking for OAuth. In reality, in most cases you don’t need to guess from the response, you already know that server requires OAuth when it needs authentication and you would only sanity-check the response to confirm it contains what you expect before you start the OAuth flow. ↩
-
It might also support HTTP Digest Authorization but I didn’t try it and could not find any documentation. ↩
-
If you know of one or find one, please tell me! As far as I can tell, the request on the
URLSessionTaskis immutable, the task doesn’t have any way to retry it and thecompletionBlockof the delegate call doesn’t have a way to specify a new request. ↩ -
If we need to support both Basic and Digest authorization the credential probably would have to be wrapped in another object that specifies whether it should be encoded as Basic or Digest. Alternatively, at least in Swift, the delegate method could be overloaded with two different completion blocks, one using the new
AuthorizationValueProvidingthe other using the oldURLCredentialand mapping it accordingly. ↩
In Don Norman’s The Design of Everyday Things, one of the prime examples of an “interface” (as in “user interface”) are doors and their handles (or the absence of). He explains the concept of affordance using doors. Wikipedia describes “affordance” as “the possibility of action”. The affordance of an object describes what the object tells you about how it can be used, what it “affords you” to do with it. Don Norman explains that e.g. a vertical bar at a door “affords” pulling. A horizontal bar, or even better, no bar at all and instead just a plate at the door, “affords” pushing. This way, you can make it obvious whether a door needs to be pulled or pushed without putting stupid labels for “push” and “pull” on it. Most people will just naturally use doors with such an “interface” correctly, without thinking about it.
Now imagine someone has read Don Norman’s book, studied it all intensively, learned all the rules of how to design good interfaces and what to avoid. They then decide to apply all this knowledge to create the worst door “interface” they can think of. Of course, to create a really bad interface you need some kind of touch interface. But just creating a normal door would be boring, I mean people would quickly forget about it and be at most mildly annoyed if they are made to feel stupid by a simple door they want to go through. To create a truly bad experience, you need to up the ante, make people really rely on that door make them really want to understand how that door works and trust it. If that door fails, it must be truly memorable.
What kind of door could you choose for that? Maybe the front-door of a house? No, whoever lives in that house could learn it and not many other people use it. Maybe the door of a safe, if that fails it would be bad right? But how many safes are there? Almost no one uses a safe. So what’s a door everybody uses daily and really, really relies on being able to control when it opens, when it closes and when it doesn’t open? Right: A toilet door.
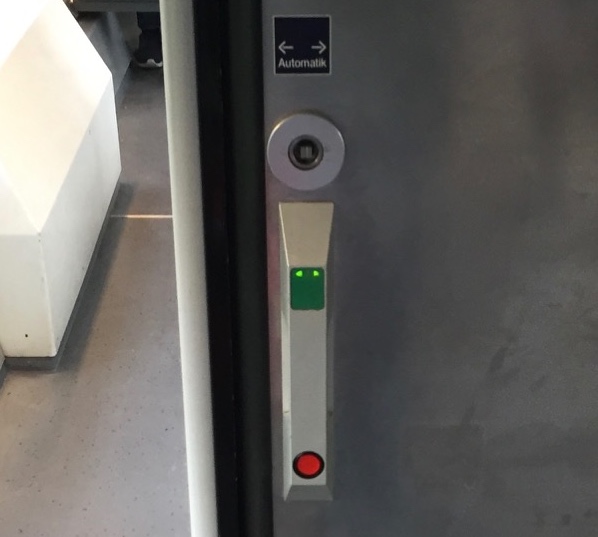
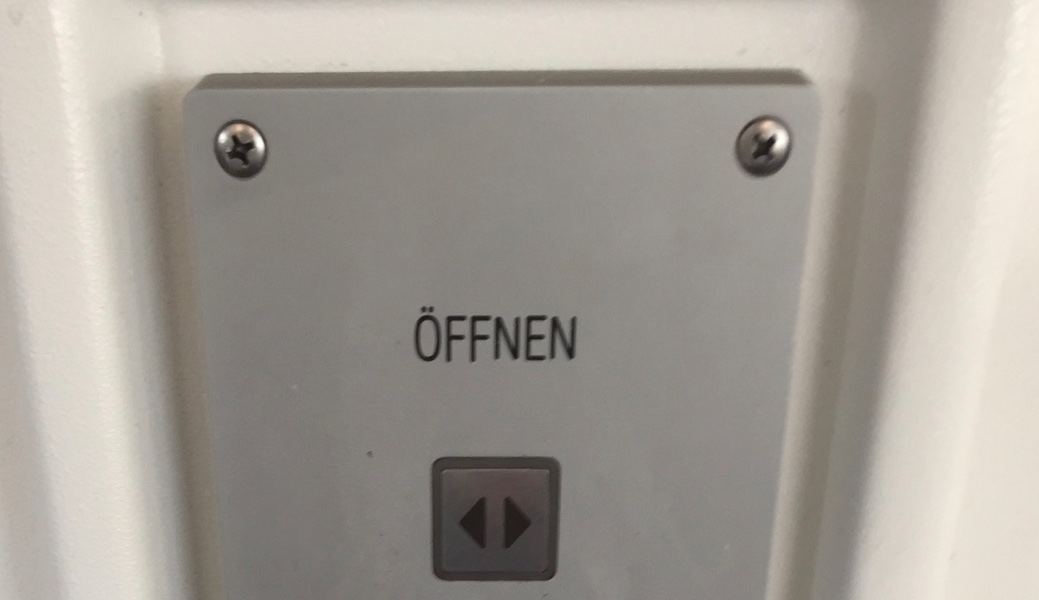
Enter “Deutsche Bahn”, the (ex state-operated) German train company1, and their disability-friendly toilets in the double-deck regional trains. I am sure their thought-process must have been something like above, there is no reasonable other explanation. This is what they look like from the outside:

Let’s ignore the obvious mechanical affordances (e.g. vertical bars indicate pulling), as we already know that this is a sliding door. It also has this nice label at the top that says something about “automatic” so we probably can’t just “pull” or “push” it. Instead, we know already from experience with these kinds of door that we need to press some kind of button to open it. But what should we press on?
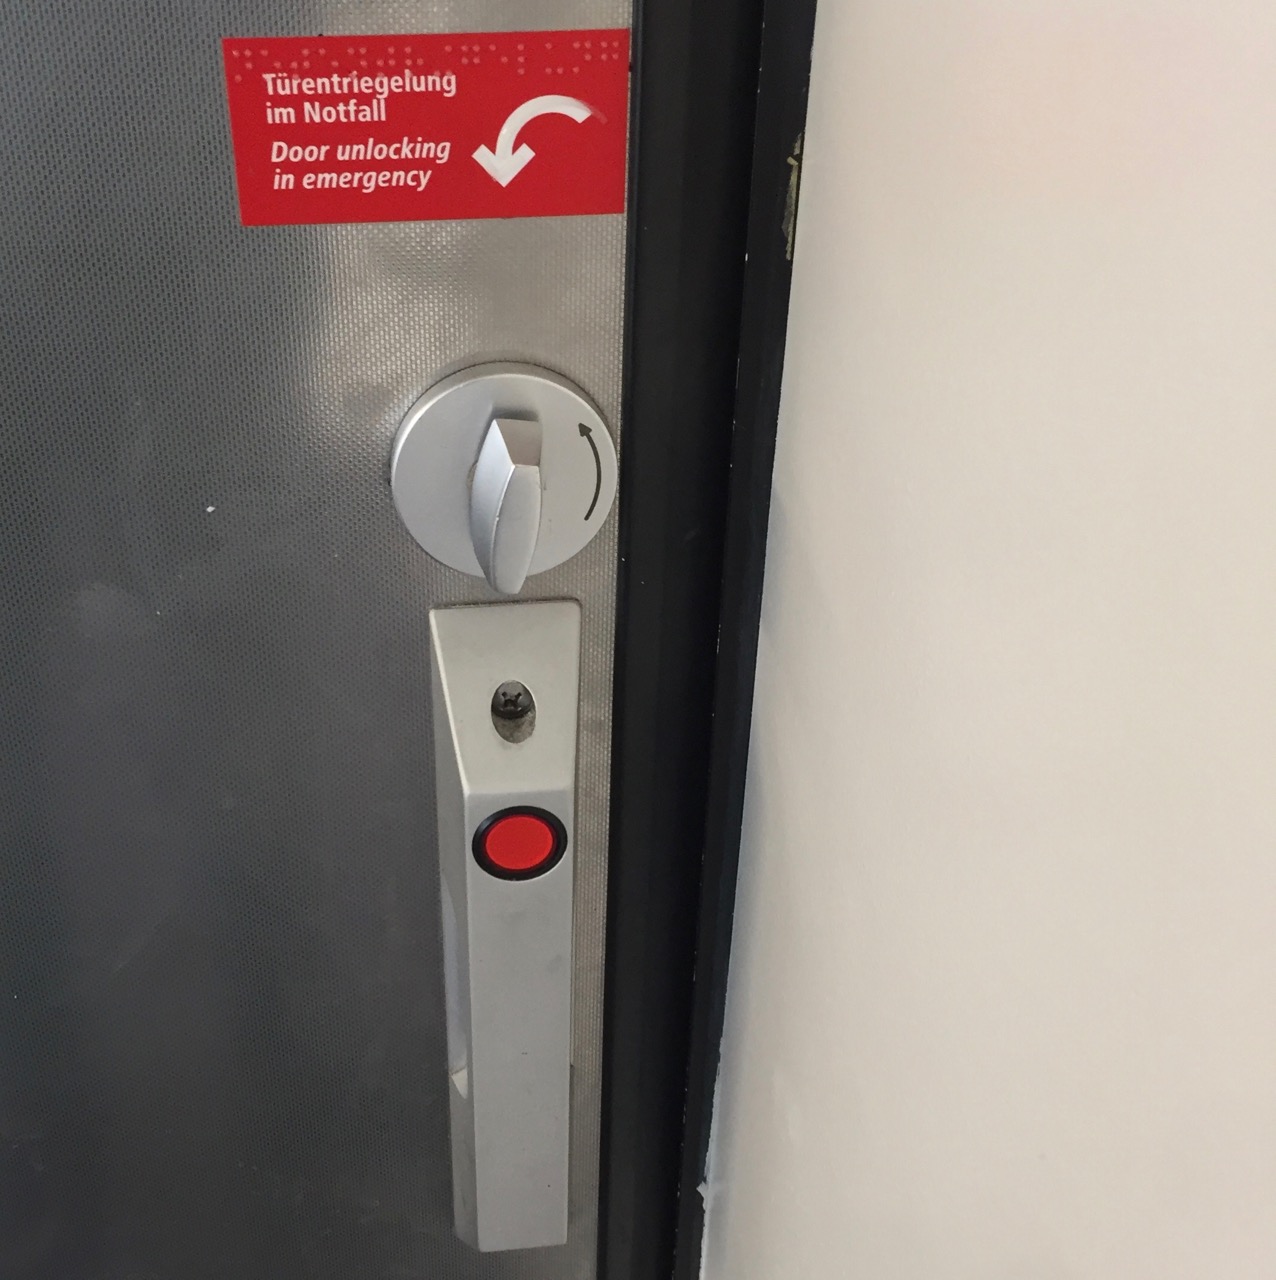
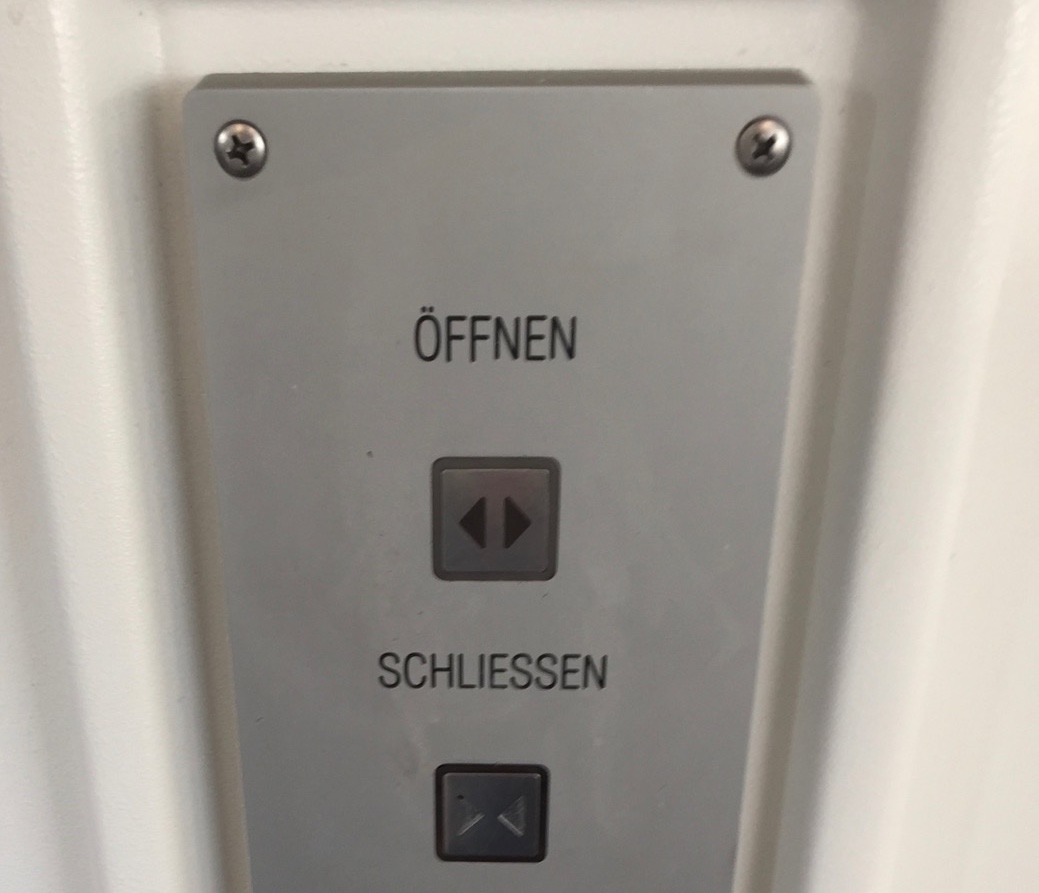
If you now said “of course it’s the big red circle button at the bottom, I mean it even shines bright red, so you know it’s there!”, you are wrong. But not alone. I’ve sat in front of that toilet door on many train rides2, and many people tried to press that “button”. Now, after you have seen this door in use you will learn that this is actually the “busy” indicator. It shines when the toilet is occupied. This is what this door “handle” looks like when the toilet is free:
So now the red circle at the bottom does not glow anymore. Instead, there are two green arrows pointing to the sides, inside the green rectangle at the top. If you saw only this picture, you would probably still have a good chance to press the red thing at the bottom. It does look very button-y. But seeing the two states after another, you have a chance of figuring out that the glowing arrows at the top indicate that there is an interface element active now that was disabled before and that it probably means that you should press the green thing at the top. Maybe. Of course, it doesn’t give any haptic feedback when you press it (remember I said you need touch interfaces for a truly bad interface?), but a short moment after you press it you hear a short hissing sound and the door moves to the side. You have passed the first test, you opened the door!3
But opening the door is only the first challenge. What you really want, is to close the door behind you. And this is the real challenge.
So you walk through the door, turn around and see this:
We have already learned that the red button is not actually a button and does not open or close the door. But the green touch area that did open or close the door is gone and there does not seem to be anything else to replace it. So we try the button anyway, for a lack of alternatives. Of course, it’s still no button and does nothing.
After spending several seconds trying to figure out how to close the door, it closes automatically. Great, so now it’s closed and we are on the inside. We don’t know yet how to get out, but maybe that problem can be solved later. But we do not feel comfortable doing our business without being assured that we will not be disturbed. How do we actually lock this door and prevent someone else from opening it while we are in the middle of things?
Nope, the big red non-button still does nothing. How about this weird mechanical dial above it? The note above says something about emergency unlocking, but everything about this door is so confusing maybe the note is not actually about that dial? So we try to turn it and of course, the door opens.
Turns out it actually was the emergency unlock/opening of the door.
The passengers in front of the toilet are happy to see us again.
And we wait, standing inside the toilet room because we still don’t know how to close that door.
Then we reach around and press the green touch area on the outside to make the door close while we are still on the inside.
At least it’s closed now.
But still not locked.
After calming down a bit, we look around. And there, on the right wall, about a meter away from the actual door handle, are some more buttons:
That label says “Open”, so at least we found out how to open the door again without the emergency thing.
Right below, there is another button:
That button’s label says “Schließen”, which means “close”. But “Abschließen” (very similar) in German means “lock”. So when I press this button, does it just close the door, or will it lock it? Maybe if I press it while the door is closed already, it will be locked? Like 2 * close = lock?
But pressing the close-button while the door is closed doesn’t seem to have any effect. And pressing the “open” button to check whether the door is locked (as there is no handle you can try), opens the door again. Hello, dear other passengers, again. Yes, I’ll be done soon. Yes, I know the toilet doesn’t smell all that great.
Ah, but there is one more button below the two others:

The label roughly translates as “when the light blinks, please lock”, which is a bad label in and of itself. At the moment the button doesn’t do anything. But after closing the door again, it starts blinking. And pressing it stops the blinking and makes the red circle at the door shine, so apparently, we finally locked the door!
Now if you trust the system enough after all this, you can now go and do your business. Of course, those three buttons are on the other side of the room from the actual toilet bowl and the room is easily two meters wide to fit a wheelchair. So, if you misunderstood how the locking of the door works and someone were to come along and open the door, while you are inside you have no chance at all to reach those buttons and quickly press the close button again. And you know how long it will take the other person to figure out how to close the door again, once they realized they should not have opened it.
So just relax and trust the technology4.
-
Of course, they only bought the train, another company built it. But first, I don’t know which one. And second, they bought that train and they accepted it. Heck, they probably even made a checklist with lots of requirements, none of which included that it should be “understandable”, “usable” or “people should be able to lock the door with less than three tries”. ↩
-
It’s where you can put your bike and it’s usually where there is enough space if the rest of the train is full and there is plenty of leg-room which is not the case in many other parts of the train. This actually ads to the humiliation when using this door. There are about 10-20 seats in front of that door. If you fail (and you most likely will), a dozen people see you fail. ↩
-
Of course, if you press on the green rectangle in the locked state, nothing happens and there is no indication what’s wrong. There is also no other sign, except for the red light, that this toilet is occupied. There is another glowing toilet sign somewhat near the door, but too far away to really notice it if you are standing in front of it. ↩
-
If you are one of those people that is now saying “Yes, it’s not optimal, but you just need to think a bit about it and pay attention to figure it out”, let me tell you two things: First, go an read Don Norman’s book because he explains very well that we should not have to think about everyday things like doors and it’s almost always the thing that’s badly designed, not the person being stupid. And second, 80% of the people I have seen using this toilet have made at least one of the mistakes I described, be it trying to unlock a locked door, accidentally opening the door again, not figuring out how to lock it, etc. If such a big majority fails to use this door, it’s not the people that are wrong. And the ones who did not fail probably just learned how to use that door in a previous encounter. ↩
The content of this blog post applies to all Apple platforms and to most other user-facing operating systems and frameworks. For brevity, I’ll use iOS as an example but almost everything in here can be done similarly on other platforms.
Some time ago I stumbled upon the following code in a project I was working on:
//  de.lproj/Localizable.strings
// [...]
"ID_REAL_CURRENT_LOCALE" = "de_DE";
// en.lproj/Localizable.strings
// [...]
"ID_REAL_CURRENT_LOCALE" = "en_US";// Usage
longDateFormatter.locale = [[NSLocale alloc] initWithLocaleIdentifier:NSLocalizedString(@"ID_REAL_CURRENT_LOCALE", @"the locale ID of this language")];What’s wrong about this you ask? Well, almost everything.
What it does
The Localizable.strings files are used to provide translations for strings used within an app on Apple’s platforms. The first one above is the translation-file for German, the second one is for English. E.g. to translate the title of a button we could do the following:
//  en.lproj/Localizable.strings
"DONE_BUTTON_TITLE" = "Done";
// de.lproj/Localizable.strings
"DONE_BUTTON_TITLE" = "Fertig";// Usage
barButton.title = NSLocalizedString(@"DONE_BUTTON_TITLE", @"Title of a Done button");NSLocalizedString checks the device’s current language and looks at the appropriate file to fetch the string. So if you have set your device to English the button’s title will be “Done”, if you have set it to German, the button’s title will be “Fertig”.
Except NSLocalizedString—and the whole localization system of iOS/macOS—is much more intelligent. E.g. it will find the best matching language. This is what my “Language and Region” settings screen looks like:
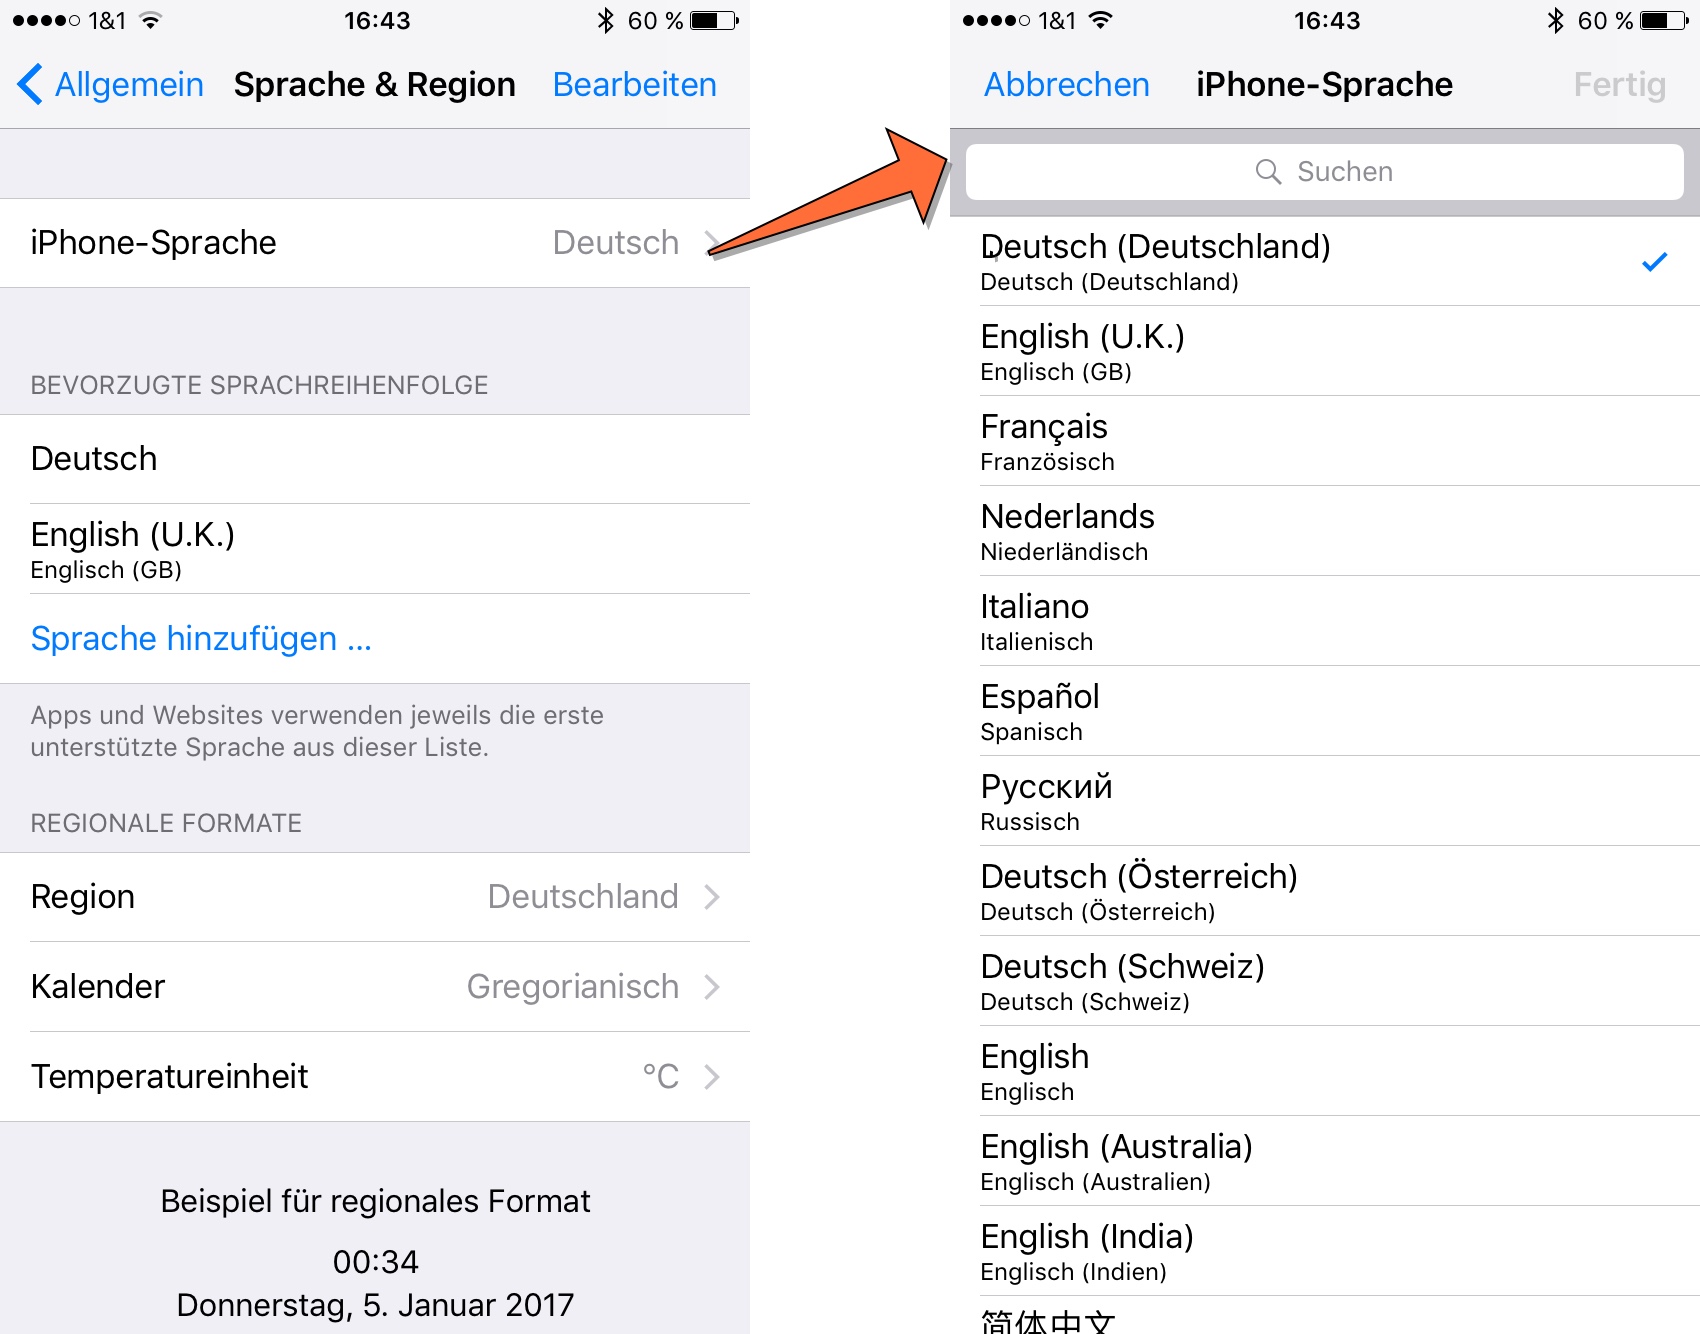
On the first screen, you can see that my iPhone is currently set to German (=Deutsch). But below you see my list of “preferred languages”. This is used to determine what language should be used. If I’m going to use an app that was developed in French, uses French as the default language and is only localized to English but not to German you might assume that the app would be displayed in French to me (as it’s the default language and German isn’t available). But that’s not what happens. Because I have set English as my second choice, the system chooses the English language localization of the app for me. That’s great because my French is really rusty.
But there is one more thing. If you look closely, on the second screen you can see that my language is actually set to “Deutsch (Deutschland)” so it’s actually “German (Germany)” or, to use it’s locale-identifier: de_DE.
This specifies the variant of German spoken in Germany in contrast to the one spoken in Austria (de_AT).
You are probably more familiar with variants of English like en_UK and en_US.
These variants allow you to fine-tune your translations to the specific dialect of a language.
But now let’s look at the example above again. We had translations for en and de, but not for de_DE. Now, if the app’s default language is English, does that mean I would get the app in English because de_DE is not available and neither is my second choice en_UK? So would I have to set my preferred languages to “German (Germany), German (Austria), German (Switzerland), English (U.K), English, English (Australia), English (India)” just to be sure I get a language I like instead of an app’s default language? Again, the system is more intelligent than that. It knows that de_DE is a variant of de and by supplying only a de translation the app developer assures us that this translation works for all variants of German. So even though I never set de as an acceptable language, this is what I will get (which will most likely be what I expect).
Great, so we can have base translations for a language family and we can have specific dialects.
So what’s the problem of putting an en_US “CURRENT_LOCALE” key into the en file and using it for the date formatter?
Okay, it would use US-American names for the month even for someone from the UK.
But last I checked, they spelt at least the month and weekday names the same, so what does it matter?
Language ≠ Locale
The problem is that we are not just setting the language of the date formatter by setting its locale but much more.
The locale encompasses not only the language (and the dialect) used, but also which currency is used, how numbers are formatted, which calendar to use and, surprise, how dates are formatted.
You can specify all that in a locale-identifier, so e.g. en_US@calendar=japanese specifies I want the US-English language variants, all the defaults from the US-region, but a Japanese calendar.
But even if I don’t specify all properties of a Locale in the identifier, the region sets some defaults. So for example, my locale identifier de_DE means the following:
- Language: Germany’s German
- Decimal Separator:
,(yes we use a comma, so 2,5 means two-and-a-half here) - Calendar: Gregorian
- Currency Code: €
- Date Formatting:
28.07.17, 16:051 (We specify the day of the month before the month and we use a dot to separate the components. We also like a 24-hour time style.)
and many other things. If you want to see all the things specified by a Locale, take a look at the documentation by Apple or of your favourite framework.
So an en_US Locale without any other specifiers means the following:
- Language: US English
- Decimal Separator:
. - Calendar: Gregorian
- Currency Code: $
- Date Formatting:
7/28/17 4:05 PM
But what does an en_UK Locale default look like? This:
- Language: British English
- Decimal Separator:
. - Calendar: Gregorian
- Currency Code: £
- Date Formatting:
28/7/2017, 16:05
So people2 from the UK apparently agree with the Germans that it should be day-month-year and one should use a 24-hour time format.
But they use slashes as separators, instead of the dots used by Germans.
Oh, and did you notice that people from the US and Germany are usually happy with the the year specified as 17, whereas people from the UK would also like to know the millenium we are talking about?
The Problem
So by using the language-file to determine the locale-code, doing that incorrectly (because e.g. en does not autoamtically mean en_US and de does not automatically mean de_DE) and using the resulting code, e.g. en_US, to instantiate and set a Locale on the date formatter, we override the defaults the user has specified in the system preferences.
This leads to a user from the UK, or anyone who prefers their apps in a variant of english, getting their dates formatted as 7/28/17 and being forced to use AM/PM again.
It also means if we use the same way to set the locale of a NumberFormatter, people from the UK would get $ as their currency symbol. And while people from Germany and Austria format a number like ten-thousand-and-a-half like this 10.000,5 and the UK and US format it like this 10,000.5, German-speaking people from Switzerland format it like this: 10'000.5.
But the Swiss can’t seem to agree as people speaking french in Switzerland do it like this: 10 000.5.
And while those are nice defaults for the separate regions, maybe some people would like to change it. Maybe I want my device-language to be German but I kinda like those slashes the people from the UK have and because I’m programming a lot I’m actually more used to having . as a decimal separator. So I just go to the system preferences and change my region to U.K. but keep the language as Deutsch.
In macOS you can even configure your own date and number formats to use, if you like. While this is not yet possible on iOS, who says it won’t be introduced with the next iOS version?
And that’s not all, I can also change the calendar. Maybe I want to try out an islamic calendar. There are several choices, I will go with the islamicTabular one and get 05.11.1438 AH for the date above. And while we are at it, if I change my language to arabic the number symbols also change, so it looks like this: ٥ ذو. ق، ١٤٣٨ هـ. I hope you all have browsers with proper unicode-support.
How to do it correctly
So, how can we support all the fancy configurations a user has made? If I can’t get the Locale-code from the language-file how am I supposed to figure out what the user wants? What Locale am I supposed to set on that date formatter?
Well, that’s actually really easy: Apple provides [NSLocale currentLocale] which contains all the settings the user made. So you can just use that. But you know what? If you create a new DateFormatter (or any other Formatter for that matter), that’s actually the default. So all you need to do to support all of this awesomeness: Don’t break it!
Do not set the locale property if you don’t know what you are doing and how locales work.
Other DON'Ts
- Do not set the
dateFormatproperty on DateFormatters that are formatting user-visible dates. Only use it for formatting dates sent to other computers that need a fixed format. And in that case you probably wantISO8601DateFormatteranyway. - Do not rely on strings produced by formatters having a specific length in your UI. As you can see above there are lots of different versions.
- In general, do not assume any region, calendar, currency, decimal delimiter, number symbol, date format etc. for your users.
- Don’t use
preferredLanguagesto figure out which language to request from a server that supplies data to your app.preferredLanguagescontains all the user’s languages including the ones your app doesn’t support. So if the user’s device is set to French, but your app only supports English, but your server supports French, your app will request French data from the server and suddenly mix English and French.- To figure out which of your supported languages the user prefers use
[[NSBundle mainBundle] preferredLocalizations]
- To figure out which of your supported languages the user prefers use
DOs
- Do use Formatters. Don’t event think about trying to format numbers, dates, date intervals, currencies, person names or any kind of measurements.
No, not even if your app should only be released in one single country that only speaks a single language (how many of those are there?).
And
[NSString stringWithFormat:"Your number: %d", theNumber](or string interpolation in Swift) counts as “rolling your own formatter”3. Apple did a really good job taking care of all those variants and edge-cases. Take advantage of it!- The
DateComponentsFormatteris good for formatting durations and things like “x minutes remaining”. However, it has some limitations, e.g. it cannot create a string like “x minutes ago”.
- The
- If you need more fine-grained control about the date-format (do you really?), use the
setLocalizedDateFormatFromTemplate-method to specify the components you need but let theDateFormattertake care of the ordering.
Further Reading
- Download this playground and play around with a few formatters to get a better feel for them.
- Take a look at Apple’s Internationalization and Localization Guide.
- The Reviewing Language and Region Seetings chapter gives a nice overview how the calendar app behaves for different languages, regions and calendars.
- ISO 639 for language codes
- ISO 3166 for country codes
- ISO 15924 for script codes
- ISO 4217 for currency codes
- Internationalization Best Practices from WWDC 2016
-
This uses the short
dateStyleandtimeStyleofDateFormatter. The longer styles already contain month names in some cases and I wanted to focus on the order of the components and the delimiters, not translations of names. ↩ -
Whenever I’m referring to “people from” in this post what I actually mean is “many people from” or “the default in this country is”. And the “default” I’m describing is the result of an iOS
DateFormatterorNumberFormatterset to the specific language and region. It might be that Apple got their defaults wrong for one of my examples, in that case, please let me know. ↩ -
If you really, really need to use
stringWithFormat:for a string with numbers displayed to a user at least uselocalizedStringWithFormat:↩