Jamie Dobson explores generative AI, developer productivity, system stability, and why historical context matters for modern engineering teams.
The post Jamie Dobson on Generative AI, Developer Productivity, and System Stability appeared first on Semaphore.
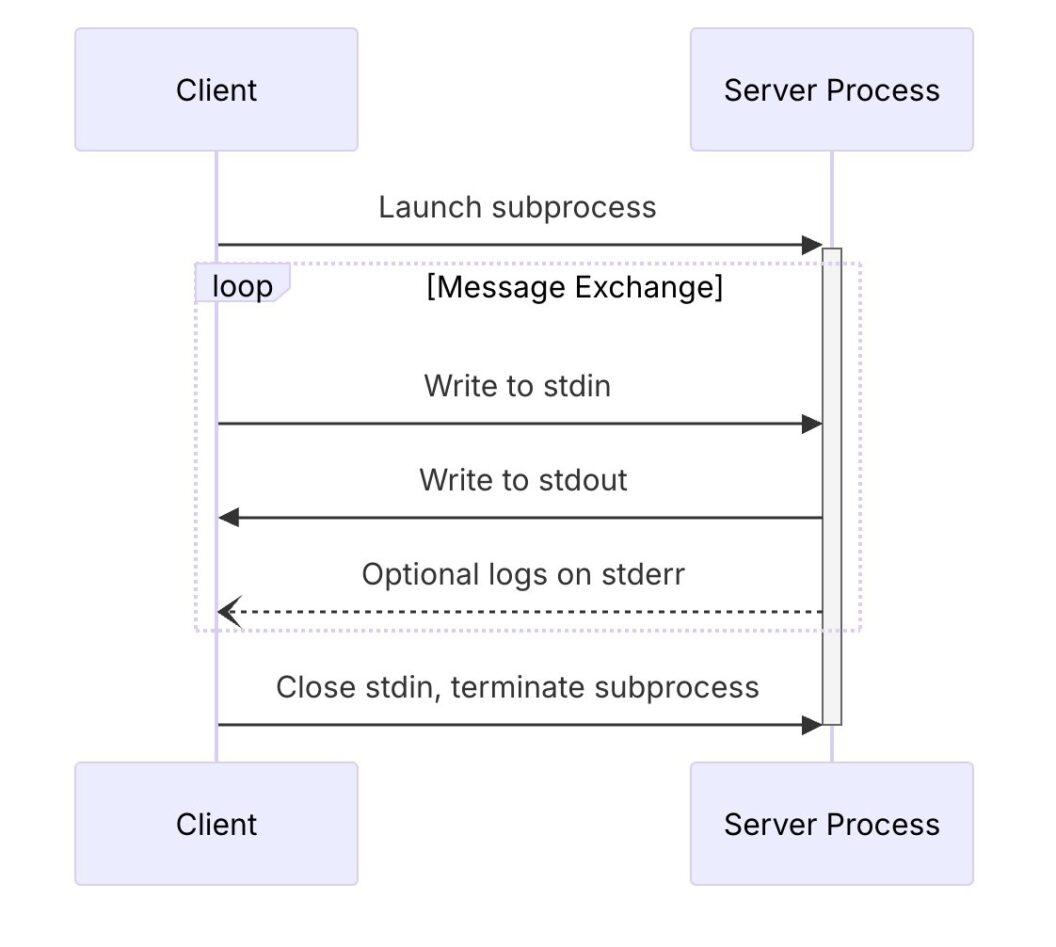
]]>In this episode of Semaphore Uncut, we talk with Jamie Dobson, co-founder and former CEO of Container Solutions, about generative AI, developer productivity, and why faster delivery can quietly undermine system stability.
Jamie brings a rare mix of perspectives—engineer, founder, executive, historian of technology, and author—to unpack what recent research is really telling us about AI-assisted software development.
Disclaimer: This interview was recorded in 2025.
From Programmer to Founder
Jamie’s journey into tech began when a computer landed on his lap and quickly turned into a professional programming career during the early days of web-scale software.
Inspired by Extreme Programming and early programmable infrastructure, he co-founded Container Solutions, which he led for a decade. About 18 months ago, he stepped down as CEO.
“Running a scaling company isn’t great for your physical or mental health,” he says. Stepping aside gave him space to think more deeply—and to finally write the book he’d been carrying for years.
Generative AI: Happier Engineers, Less Stable Systems
The conversation centers on a surprising signal from recent DORA research: teams using generative AI report higher developer happiness and productivity—but lower system stability.
“People are happier,” Jamie notes, “but the systems are becoming less stable.”
The data is early, but the pattern raises an uncomfortable question for engineering leaders: what are we trading off for speed?
Plausible Code Isn’t Always Correct Code
Jamie’s hypothesis comes down to how generative AI works.
“These systems generate the next plausible token, not the right one,” he explains.
The result is code that looks correct and often works—at least initially. Developers feel productive and energized, but subtle flaws can slip through, slowly degrading reliability.
“You can have happy developers at the exact moment you destabilize the system,” Jamie says.
Speed Without Understanding
Generative AI also changes how engineers learn.
Where learning once involved reading, watching talks, and building intuition over time, AI compresses that process into minutes. The answers are actionable—but the digestion time is gone.
Engineers move faster, but their mental models may lag behind the systems they’re changing.
AI Is a Tool, Not an Authority
Jamie isn’t anti-AI. Used well, it can unblock creativity and help people move forward—especially under pressure.
He pushes back hard on claims that using AI makes people lazy or less thoughtful.
“That’s a very privileged position,” he says. Not everyone has the time for deep learning journeys. The real risk isn’t usage—it’s uncritical trust.
Why History Makes AI Less Scary
Many of today’s “new” ideas aren’t new at all.
Cloud computing traces back to time-sharing in the 1960s. Neural networks go back to the perceptron in 1969. Even our tendency to project intelligence onto machines—the ELIZA effect—is decades old.
“When you understand the past,” Jamie says, “modern AI becomes much easier to reason about.”
What’s Next for Jamie Dobson
Jamie remains deeply involved with Container Solutions, working with leadership teams on AI adoption, compliance, and large-scale system design.
He’s also preparing a single-narrator podcast, inspired by 1950s radio dramas, adapting Visionaries, Rebels and Machines into a weekly audio series.
Follow Jamie Dobson
- X / Twitter: https://x.com/JamieDobson
- LinkedIn: https://www.linkedin.com/in/jamie-dobson/
The post Jamie Dobson on Generative AI, Developer Productivity, and System Stability appeared first on Semaphore.
]]>Sebastian Gierlinger shares how Storyblok scaled a remote engineering team, evolved delivery, and balanced process, people, and technology.
The post Sebastian Gierlinger on Scaling Remote Engineering at Storyblok appeared first on Semaphore.
]]>In this episode of Semaphore Uncut, we talk with Sebastian Gierlinger, VP of Engineering at Storyblok, about what it really takes to scale a fully remote engineering organization—from early startup days to a 250-person company.
Disclaimer: This interview was recorded in 2025.
From Security to Engineering Leadership
Sebastian’s career didn’t start with a classic computer science path. He studied computer and media security, earning both bachelor’s and master’s degrees—an influence that still shapes how he approaches engineering leadership today.
After university, he founded his first startup (which didn’t work out), then spent several years in a large corporate environment building e-government software. He later joined Ghost, the open-source blogging platform, working on infrastructure for the hosted product.
Five years ago, he joined Storyblok—first as VP of Developer Experience, building DevRel and solution engineering teams, and later stepping into the VP of Engineering role. Today, he oversees product engineering, infrastructure, product management, and developer experience.
Why Storyblok Went Headless
Storyblok is a headless content management system. Instead of tightly coupling content and presentation, Storyblok hosts the backend and admin interface and exposes content through APIs. Teams are free to choose any frontend—web, mobile, or otherwise.
The payoff is long-term flexibility. Frontend technologies change quickly; content systems don’t. By decoupling the two, teams avoid locking themselves into decisions they’ll regret years later. The same principle applies to search, e-commerce, and other capabilities that are better treated as composable systems rather than built-ins.
The Engineering Stack: Simple by Design
Storyblok runs fully on AWS, but with intentional abstraction to avoid hard lock-in. Terraform is used for infrastructure, API services run in containers on managed Kubernetes, and a large relational database sits at the core.
The frontend is a Vue.js application that consumes the same APIs customers use.
There’s nothing flashy here—and that’s the point. The stack is designed to be understandable, maintainable, and scalable without unnecessary complexity.
Scaling from 10 to 250 People—Remotely
When Sebastian joined, Storyblok had around 10 people. Today, it has roughly 250 employees, with about 80 in engineering.
One inflection point stands out: crossing 100 people.
“That’s when you stop knowing everyone,” Sebastian says. “You get a Slack message from someone you don’t recognize—and then you find out they’re on your team.”
Storyblok is fully remote, with engineers spread across Europe, the US, and Latin America. That shapes everything—from working hours to how decisions are made.
To keep alignment strong, the company leans on informal coffee chats, intentional relationship-building, and annual in-person retreats. High-stakes conversations—vision, strategy, and major tradeoffs—are handled face to face whenever possible.
When Scrum No Longer Worked
Like many startups, Storyblok started with Scrum—largely because it was the default choice. As the organization grew, cracks appeared.
Specialists clustered around specific areas of the product, creating bottlenecks. Some teams were overloaded while others had spare capacity. Work slowed, not due to lack of people, but because it couldn’t move smoothly across boundaries.
To address this, Storyblok experimented with Shape Up, the methodology popularized by Basecamp. Longer cycles, clearer project shaping, and teams formed around projects—not components—helped the company finish more work and reduce half-done initiatives.
The key lesson wasn’t that Shape Up is universally better, but that process needs to evolve as organizations scale.
Balancing Specialization and Flexibility
Storyblok separates backend, frontend, and QA roles—partly driven by the Ruby ecosystem, where deep specialization is common.
Still, Sebastian is cautious about going too far.
“At our size, we need people who can work across the system,” he says. That’s especially true for maintenance and support work, where narrow ownership doesn’t scale. Engineers don’t need to be experts in everything, but they do need shared context.
AI: Useful, Powerful, and Easy to Over-Trust
Sebastian looks at AI from three angles.
For customers, AI is optional. Some want it, others don’t. Storyblok makes AI features available but never mandatory, and is working toward options that let customers control which AI providers are used.
For developers, GitHub Copilot is the baseline. Other tools are encouraged on an experimental basis, especially where they help with debugging and understanding failures.
From a leadership perspective, Sebastian is both excited and cautious. AI can accelerate work—but it can also flood systems with low-quality code if left unchecked. The future, he believes, will involve more review, judgment, and ownership over what AI produces.
Scaling Is a Systems Problem
Storyblok’s journey reinforces a familiar lesson for engineering leaders: scaling isn’t mainly about hiring or tools. It’s about systems.
What works at 10 people breaks at 100. Informal alignment gives way to intentional structure. Processes need to be revisited as teams, codebases, and delivery pipelines grow.
For remote-first teams, the challenge isn’t just shipping more code—it’s maintaining shared understanding of the system, the strategy, and the work itself.
Follow Sebastian Gierlinger & Storyblok
Website: https://www.storyblok.com
Docs: https://www.storyblok.com/docs
LinkedIn (Sebastian): https://www.linkedin.com/in/sgierlinger
X: https://x.com/sebgie
The post Sebastian Gierlinger on Scaling Remote Engineering at Storyblok appeared first on Semaphore.
]]>See how Semaphore’s MCP Server enables AI agents to read docs, build CI pipelines from scratch, debug failures, and continuously improve workflows using real CI/CD context.
The post MCP Server Update: AI Agents Can Now Access Semaphore Docs appeared first on Semaphore.
]]>CI/CD systems are driven by configuration, conventions, and documentation. Without access to that knowledge, AI agents are forced to guess. This leads to brittle pipelines, incorrect YAML, and fixes that don’t quite work.
For AI to be truly useful in DevOps, it needs the same source of truth humans rely on: the docs.
MCP Documentation Resource
Semaphore MCP doc_tools resource gives AI agents structured, read-only access to Semaphore’s official documentation. This includes details about pipeline configuration, YAML syntax, available features, and best practices. Instead of guessing how Semaphore works, an AI can now look it up just like a human would.
When an agent needs to create or modify a pipeline, it can:
- Read the Semaphore pipeline YAML documentation
- Understand required and optional fields
- Learn how caching, test reports, and workflows are configured
- Apply correct syntax and semantics on the first attempt
Automatically Creating a Working Pipeline
Once the AI agent has access to both the repository and Semaphore’s documentation through doc_tools, it can move from understanding to execution.
I asked Claude to generate a brand new semaphore.yml file for my project. What I get is a pipeline built with awareness of the repository’s language, dependencies, and test structure, combined with Semaphore’s recommended configuration patterns.
The resulting pipeline does exactly what we asked:
- Runs the project linter
- Executes unit tests
- Caches dependencies to speed up future runs

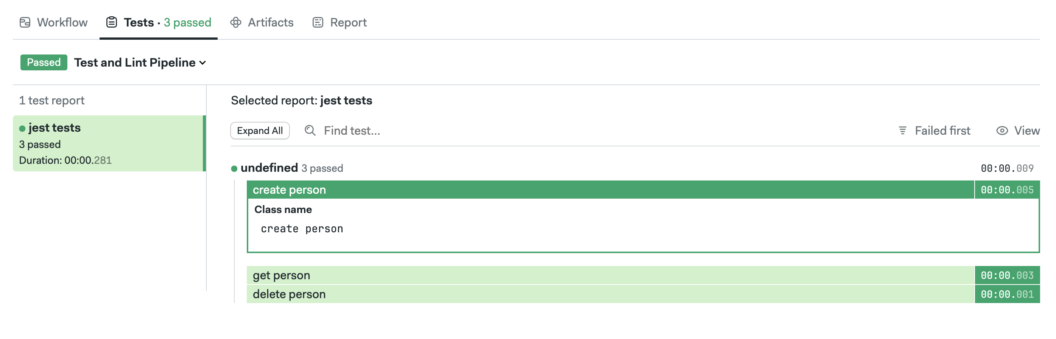
Improving Feedback with Test Reports
At this point, the pipeline is working as intended: linters run, unit tests execute, and results are visible in the build logs. Test reports transform unstructured console output into structured, machine-readable data. They make it easy to see which tests failed, why they failed, and how failures evolve over time.
So, I asked Claude to configure test reports for my project. The result is that:
- All test failures are collected in one place
- Results are easier to review and compare
- AI agents can quickly access structured failure data instead of parsing logs
Next Steps
When AI agents are grounded in authoritative docs and given structured access to CI/CD systems, they stop guessing and start collaborating. Semaphore’s MCP Server makes that possible by turning pipelines, logs, and documentation into shared knowledge that both humans and AI can work with.
Semaphore’s MCP Server is being actively developed with this future in mind. The goal is simple but ambitious: give AI agents the same depth of understanding and operational access that experienced engineers have. In the next update, we plan to augment security using OAuth authentication.
Thank you for reading and happy building 🚀
The post MCP Server Update: AI Agents Can Now Access Semaphore Docs appeared first on Semaphore.
]]>Ubuntu 20.04 will be removed from Semaphore in March 2026. Update your pipelines now to avoid brownouts and job failures.
The post Announcement: Ubuntu 20.04 Deprecation in Semaphore appeared first on Semaphore.
]]>Ubuntu 20.04 (Focal Fossa) is approaching the end of its supported lifecycle on Semaphore. To ensure the security, reliability, and maintainability of our platform, we are announcing the deprecation and end of life of Ubuntu 20.04 build environments.
Semaphore users should consider switching to Ubuntu 24.04 as Ubuntu 22.04 is scheduled for deprecation during Q2 of 2026.
Why We’re Deprecating Ubuntu 20.04
As operating systems age, they cease to receive timely security updates and ecosystem support. Continuing to run CI workloads on deprecated operating systems increases operational risk and limits our ability to ship improvements.
Deprecation Timeline
We will gradually phase out Ubuntu 20.04 using a series of brownout periods. During these windows, jobs configured to run on Ubuntu 20.04 will temporarily fail to start. This is intentional and designed to help you detect remaining usage before final removal.
First Brownout Period
February 2 – 8, 2026
Jobs running on Ubuntu 20.04 will not start for 15 minutes during the following times:
- UTC 00:00 — 00:15
- UTC 10:00 — 10:15
- UTC 15:00 — 15:15
Second Brownout Period
February 9 – 15, 2026
Jobs running on Ubuntu 20.04 will not start for 30 minutes during the following times:
- UTC 00:00 — 00:30
- UTC 10:00 — 10:30
- UTC 15:00 — 15:30
Third Brownout Period
February 16 – 22, 2026
Jobs running on Ubuntu 20.04 will not start for 1 hour during the following times:
- UTC 00:00 — 01:00
- UTC 10:00 — 11:00
- UTC 15:00 — 16:00
Fourth Brownout Period
February 23 – 29, 2026
Jobs running on Ubuntu 20.04 will not start for 3 hours during the following times:
- UTC 00:00 — 03:00
- UTC 10:00 — 13:00
- UTC 15:00 — 18:00
End of Life
Starting March 2026, Ubuntu 20.04 build environments will reach end of life on Semaphore.
At this point:
- Jobs configured to run on Ubuntu 20.04 will no longer start
- The Ubuntu 20.04 image will be fully removed from the platform
What You Need to Do
To avoid any disruption, update your pipelines to use a supported Ubuntu version as soon as possible.
- Identify Usage: check your Semaphore configuration files for references to Ubuntu 20.04 (for example, `ubuntu2004`).
- Migrate to a Supported Ubuntu Version: we recommend migrating to Ubuntu 24.04] if possible to ensure you are using the latest version available. If you cannot use Ubuntu 24.04, you can switch to Ubuntu 22.04. But keep in mind that this image is scheduled for deprecation during Q2 of 2026.
- Validate Your Pipelines: run your pipelines after upgrading to ensure all dependencies and scripts work correctly on the new environment.
Need Help?
If you have questions or run into issues while migrating, please reach out to Semaphore support or consult our documentation. We strongly encourage completing your migration before the first brownout period begins in February 2026.
Thank you for helping us keep Semaphore secure, stable, and up to date.
The post Announcement: Ubuntu 20.04 Deprecation in Semaphore appeared first on Semaphore.
]]>ARM-based machines on Semaphore are now generally available. Build, test, and deploy natively on ARM for faster, more reliable CI/CD pipelines.
The post Announcing ARM Machines on Semaphore appeared first on Semaphore.
]]>
Today, we’re excited to announce that as of December 1st, ARM-based machine types on Semaphore have moved into **general availability**. This new R1 generation of machines brings native ARM architecture support to your CI/CD pipelines.
In practice, that means you can build, test, and deploy software on the same CPU architecture that’s increasingly used in cloud servers and devices, opening up faster builds and more reliable cross-platform testing for all Semaphore users.
Who are these for?
If your application runs on or is compiled for ARM-based environments, these machines were made for you. Here are some practical CI/CD use cases where ARM machines can make a big difference:
- Cross-platform CI pipelines: Run jobs on both x86_64 and ARM in parallel to ensure your code works flawlessly on multiple architectures. For example, you can build and test on a regular x86 machine and an ARM machine in the same workflow, guaranteeing consistent results across platforms.
- Building ARM-native binaries and containers: Compile software directly on ARM to produce binaries or Docker images optimized for ARM64, without needing complicated cross-compilation toolchains. This is great for projects that distribute CLI tools, libraries, or container images for embedded hardware, AWS Graviton, or other ARM systems.
- Integration tests for ARM-based cloud deployments: If your production runs on ARM-powered servers (like AWS Graviton instances or Ampere-based VMs), you can now run integration and end-to-end tests in an identical CPU environment. This helps catch architecture-specific issues early, giving you confidence that your app will behave the same way in ARM-based staging or production.
Getting Started with ARM Machines
Getting up and running with ARM machines on Semaphore is simple. You can select the new machine types in your pipeline configuration just like any other agent.
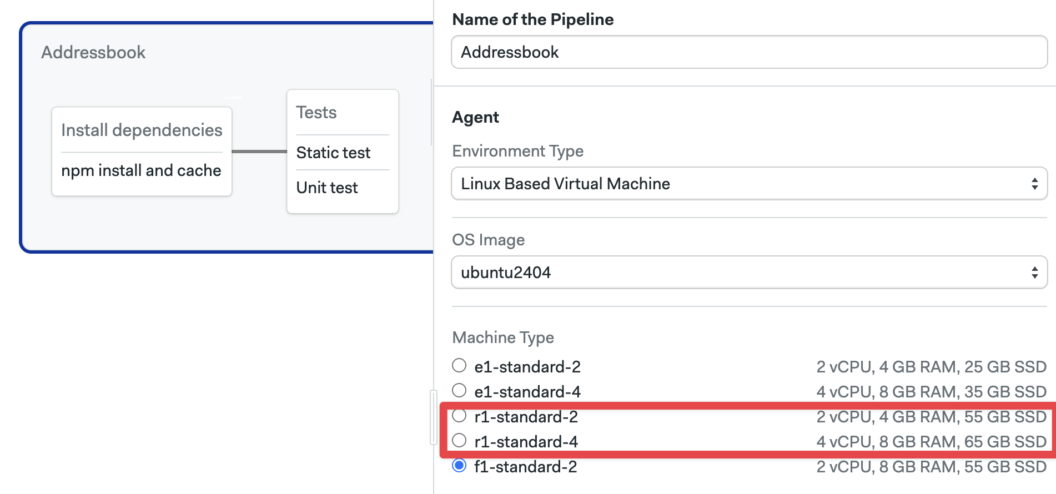
If you prefer to use YAML for your pipelines, the following example configured the ARM environment paired with an Ubuntu 24.04 ARM OS image:
version: 1.0
name: ARM-Based Pipeline

agent:
  machine:
    type: r1-standard-4
    os_image: ubuntu2404
Try ARM Machines Today
These new machine types on Semaphore allows seamless ARM architecture building and testing. R1 machines remove the guesswork and inefficiency of emulation by giving you a fully native ARM environment for your CI/CD needs.
For more information, check out the official Semaphore documentation on machine types. And, as always, feel free to reach out with feedback or support.
Happy building on ARM! 🚀
The post Announcing ARM Machines on Semaphore appeared first on Semaphore.
]]>Keren Fanan and Hadar Geva discuss reinventing frontend development with MyOp, runtime UI orchestration, safer deployments, and AI-driven change.
The post Keren Fanan and Hadar Geva on Reinventing Frontend with MyOp appeared first on Semaphore.
]]>In this episode of Semaphore Uncut, we sat down with Keren Fanan (CEO & Co-founder) and Hadar Geva (CTO & Co-founder) of MyOp to talk about one of the hardest problems in frontend engineering: how to keep shipping UI as frameworks, tools, and expectations change—without constantly rewriting your application.
Drawing on their experience building and scaling products at companies like Get, Moon Active, Wix, and Jive Software, Keren and Hadar explain why frontend systems tend to calcify over time, and how MyOp rethinks UI as a runtime system rather than a static part of the codebase.
From Scaled Products to a Shared Frontend Problem
Both founders come to MyOp with extensive experience operating large, production-grade products.
Keren Fanan spent years leading product, revenue, and monetization teams at Get and Moon Active, where UI changes were tightly coupled to growth and experimentation. Hadar Geva led frontend architecture and developer experience at Wix, overseeing technical direction for hundreds of frontend engineers across multiple product groups.
Despite working in different roles, they encountered the same recurring issue: frontend systems rarely evolve cleanly. Framework upgrades introduce breaking changes, legacy code persists far longer than intended, and teams end up running multiple frameworks side by side with no safe way to experiment or iterate.
What MyOp Is Building
MyOp is a frontend development platform that allows teams to plug external, independently deployed UI components directly into a live production application.
Instead of baking every UI change into the main codebase, MyOp introduces a runtime layer between application logic and UI. Components are loaded dynamically, managed remotely, and can be swapped or rolled back without redeploying the host application.
This approach allows teams to ship UI updates without redeploying the core application, run experiments directly in production, mix frameworks like Angular, React, Vue, and Web Components, modernize legacy frontends incrementally, and integrate AI- or low-code–generated UI without committing to long-term architectural decisions.
Components as Runtime Contracts
A central idea behind MyOp is redefining what a component represents.
In MyOp, a component is a contract rather than a specific implementation. The contract defines how a component renders into the DOM, how it receives props and refs, how lifecycle events are handled, and how cleanup occurs.
That same contract can then have multiple implementations—referred to as variants or skins—built with different frameworks or UI approaches. This abstraction makes framework integration lightweight, often requiring only a small adapter layer.
Integrating MyOp into an Existing Application
Adopting MyOp does not require a rewrite.
Teams add a small Host SDK to their existing application, either via import or script tag, and call a function to load a component into a specific DOM element. From that point on, MyOp manages rendering, lifecycle, and updates for that subtree, while the rest of the application remains unchanged.
Remote components can live in separate repositories, be deployed independently, and be tested independently. The host application becomes stable, while UI development becomes more flexible.
Runtime Rollouts, Segmentation, and Experiments
Because components are loaded at runtime, MyOp naturally supports segmentation and controlled rollouts.
Instead of shipping multiple versions of a component behind feature flags in the same codebase, MyOp evaluates which variant to load at runtime based on segments. Segments are defined as simple async boolean functions inside the host application and can reflect any internal logic—such as user type, environment, or account status.
In practice, this makes it possible to release UI changes only to internal users or QA, run production previews without spinning up additional environments, roll changes out gradually to a subset of users, and instantly revert if something goes wrong—all without redeploying the host application.
All of this happens inside real production traffic, without duplicating infrastructure or branching code paths.
How This Differs from Micro-Frontends
While MyOp shares some similarities with micro-frontend architectures, the founders see it as a broader approach.
Traditional micro-frontends focus on splitting applications at build time. MyOp focuses on runtime orchestration, framework-agnostic components, and centralized UI control. This orchestration layer is often the missing piece in micro-frontend implementations, where teams stop once independent deployment works but struggle with long-term management.
MyOp adds that missing control plane for UI.
MyOp in 2025 and the Role of AI
MyOp has been live for just over a year. After securing pre-seed funding, the team built and released the first version with early customers and is now opening the platform more broadly.
The MyOp SDK is open source, and the platform offers a freemium tier for developers who want to experiment.
AI is a major driver behind MyOp’s direction. Many AI-generated UI components default to specific frameworks, creating friction for teams with existing codebases. MyOp acts as a connector, allowing teams to test AI-generated or externally built UI safely in production without committing to a single tool or framework.
Getting Started
Developers interested in exploring MyOp can visit myop.dev, where they’ll find documentation, code examples, and access to the MyOp dashboard.
The team encourages hands-on experimentation as the best way to understand how runtime UI composition changes the way frontend systems are built and operated.
Resources
- Website: https://www.myop.dev
- LinkedIn:
The post Keren Fanan and Hadar Geva on Reinventing Frontend with MyOp appeared first on Semaphore.
]]>Explore Semaphore’s latest MCP server updates, including automatic project initialization, AI-optimized test summaries, and new pipeline rebuild capabilities that bring AI-assisted CI/CD closer than ever.
The post New Features for Semaphore MCP Server appeared first on Semaphore.
]]>A few weeks ago, we introduced the first version of Semaphore’s MCP server; a new way for AI agents to access your CI/CD data directly from the source and opening the door to smarter automation, including self-healing pipelines. Today we announce three new features for AI-Driven CI/CD.
Since then, we’ve been hard at work expanding what the MCP server can do. Our goal is simple: make AI a natural part of your CI/CD workflow, whether you’re working from the terminal, your IDE, or alongside an AI assistant. Today, we’re releasing several new features that take us one step closer to fully AI-assisted CI/CD.
What’s New
This month’s update introduces three significant improvements to Semaphore’s AI ecosystem:
- Automatic Project Initialization: Setting up your AI agent to work with Semaphore just got dramatically easier. With a single command, your agent receives all the prompts, configuration files, and best practices it needs to integrate smoothly with your project.
- AI-Optimized Test Summaries: test-results can now create AI-optimized JSON summaries. These files are optimized for AI consumption, needing less context to achieve better results.
- Pipeline Rebuild Capabilities: The MCP server is no longer read-only. AI agents can now rerun complete workflows or start new ones.
Automatic MCP Setup
Once your MCP server is configured in the AI tool of your choice (in this example, Claude), you can initialize a project by running:
/semaphore mcp_setup my-project my-orgThe agent automatically generates and updates a set of project files, similar to how /init commands are used by agents to configure projects.
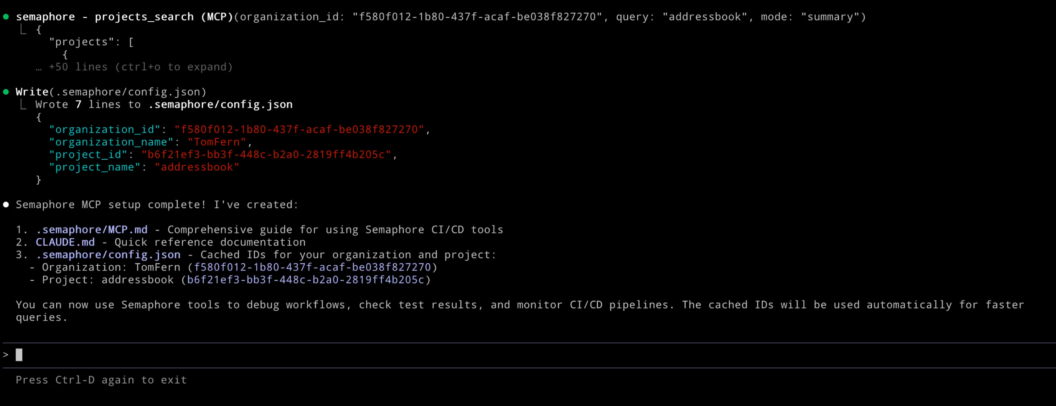
These files act as its “operating manual” for working with Semaphore:
CLAUDE.md: an instruction set that teaches Claude how to interact with Semaphore’s MCP server..semaphore/MCP.md: a reference of best practices and a full list of available MCP tools..semaphore/config.json: cached project information that helps reduce token usage and speed up interactions.
Together, these files allow your AI agent to understand your environment, navigate your pipelines, and perform tasks with significantly more accuracy.
AI-Optimized Test Results
In a previous demo, we showed how tools like GitHub Copilot can help automatically repair failed builds by analyzing your test output. It worked well for simple errors but since we used XML reports as context, the results were mixed for complex solutions.
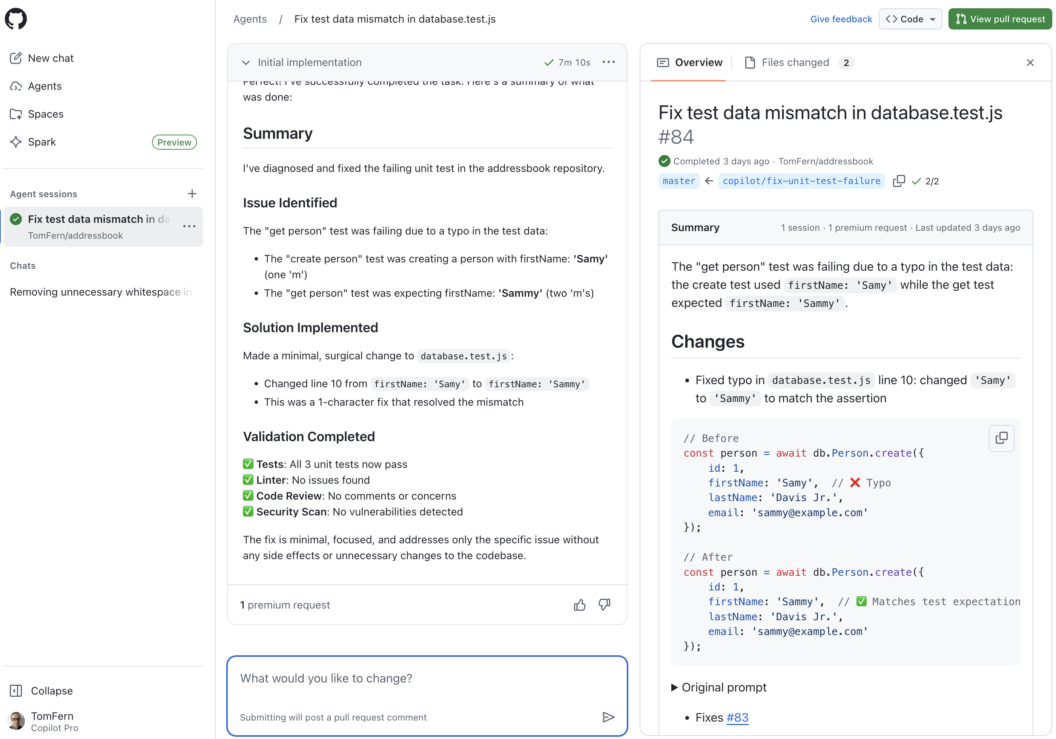
XML is no longer the only option. You can enable JSON summaries by adding --generate-mcp-summary to your test results command:
test-results publish --generate-mcp-summary junit.xmlThis attaches an AI-ready .json summary alongside your standard test artifacts. Any AI agent such as Copilot, Claude, or Codex can then use this structured data to produce more accurate diagnoses and more reliable repair suggestions using less tokens.
AI Agents Can Now Rebuild Pipelines
When we first introduced Semaphore’s MCP server, it offered read-only access to your CI/CD environment. AI agents could inspect pipelines, analyze artifacts, and help you understand failures but they couldn’t take direct action.
With this update, AI agents can rerun entire pipelines or selectively rebuild only failed jobs, giving them an active role in managing your CI/CD workflows.
This feature makes CI/CD more convenient and allows for more advanced automation. With rebuild capabilities in place, AI agents can begin to:
- Automatically retry flaky jobs
- Validate fixes they propose
- Respond programmatically to CI/CD events
- Help enforce build stability and quality
Conclusion
AI-assisted CI/CD is here to help how teams build, test, and ship software. We’re committed to building the best ecosystem for integrating AI into your workflows. More capabilities are on the way, and we’re excited to share what’s coming next.
Thank you for following along, and happy building!
The post New Features for Semaphore MCP Server appeared first on Semaphore.
]]>Learn how to integrate Semaphore with GitHub Copilot Agents to automatically diagnose CI failures, generate fixes, and create self-healing pipelines.
The post Self-healing CI with GitHub Copilot and Semaphore appeared first on Semaphore.
]]>CI pipelines are supposed to accelerate development—but when a single test fails, everything stops. Developers drop what they’re doing, open logs, scroll through stack traces, and manually track down the issue. It’s disruptive and pull attention away from more meaningful work.
AI-Driven CI is here to change that: coupling Semaphore with GitHub Copilot Agents makes creates the opportunity for self-healing pipelines.
In this guide, we’ll walk through exactly how to set up this integration and how you can use it to transform routine CI maintenance into a fully automated, self-healing process. For a step-by-step tutorial, check out our documentation page.
Self-healing Pipelines
Instead of treating failures as static events, Semaphore forwards them to GitHub Copilot Agents, which act as automated problem-solvers inside your development workflow. When a job fails, Copilot receives:
- the failure context,
- the test output,
- a prompt that requests to fix the CI
From there, Copilot begins working like a developer assigned to the task: it reads the issue, analyzes the test results, identifies the likely fix, and prepares a Pull Request with corrections.
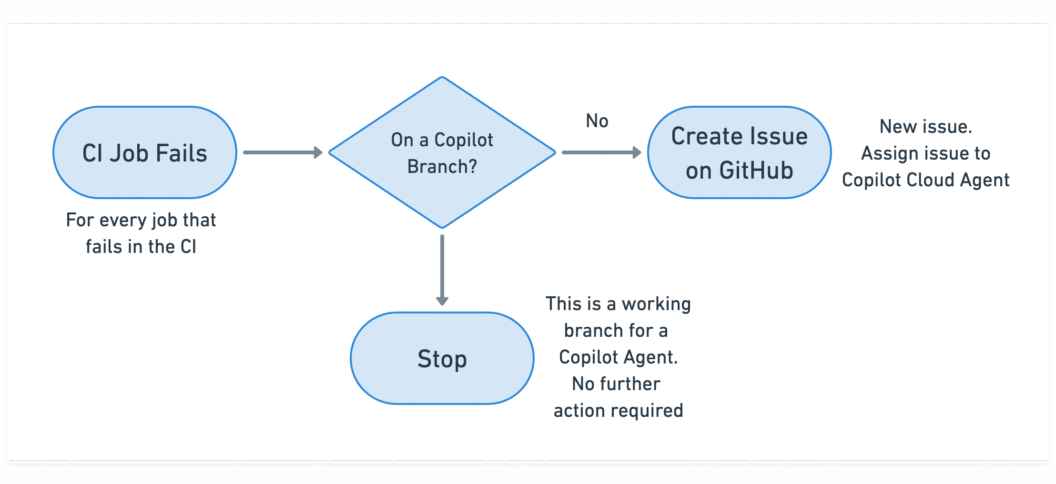
The result is a lightweight, cloud-driven self-healing mechanism that works alongside your existing CI without additional infrastructure, custom runners, or no workflow redesign required.
Prerequisites
Before connecting Semaphore with GitHub Copilot Agents, there are a few requirements to set up. These ensure that Semaphore can communicate with GitHub securely and that Copilot has permission to act on your repository.
GitHub Personal Access Token (PAT)
Semaphore needs permission to create issues and pull requests on your behalf.
To enable this, generate a GitHub Personal Access Token with the following scopes:
- repository: full read/write access
- read:org: so the CI can access your GitHub organization
This token will later be added as a secret in Semaphore so your pipelines can call the GitHub API.
Copilot Agents Enabled in Your GitHub Organization
The integration relies on GitHub Copilot’s Cloud Agents, which run fixes in an isolated hosted environment.
Your organization needs a plan that supports them:
- Copilot Pro
- Copilot Pro+
- Copilot Business
- Copilot Enterprise
You can confirm this under: GitHub → Organization Settings → Copilot → Agents
(Optional but Highly Recommended) Test Reports
Copilot Agents work best when they have structured test output to analyze. If your project doesn’t already produce JUnit XML reports, you can enable them in Semaphore’s test reporting feature
Setting Up the Integration
With the prerequisites in place, you can now connect Semaphore to GitHub Copilot Agents. The setup is lightweight and only needs a few adjustments to your CI configuration. Once done, every failing job in your pipeline can automatically generate a Copilot-driven fix.
Add GitHub Token Secret
Semaphore needs secure access to GitHub’s API to create issues and PRs. To enable this:
- Open your project in Semaphore.
- Navigate to Secrets → Create Secret.
- Name the secret:
gh-cli - Inside the secret, add the environment variable:
GH_TOKEN = <your GitHub Personal Access Token>
This secret will be attached to CI blocks later so they can call the GitHub CLI without exposing credentials.
Disable Workflow Runs for Draft Pull Requests
Copilot creates draft Pull Requests while it’s working and often updates them several times. You don’t want Semaphore running a full pipeline for each draft update.
To prevent unnecessary CI runs:
- Go to your project’s Settings.
- Find Build Pull Requests from Forks / Draft PRs.
- Set Draft Pull Requests → Disabled.
This ensures that only finished Copilot PRs trigger CI, not intermediate work.
Create a Prompt Template for Copilot
Copilot needs clear instructions on how to approach a failing job.
To provide this, add a text file in your repository:
prompt-template.txtA minimal example:
Read the following JUnit test report, diagnose the failure, and create a Pull Request with the fix.
Validate the fix before creating the Pull Request.
You can expand the prompt with:
- coding standards
- architectural constraints
- preferred file locations
- specific test commands
Add Copilot Trigger Logic to Failing CI Blocks
Finally, update any block in your Semaphore pipeline that might fail due to tests or builds.
In each such block:
- Attach the GitHub Token Secret
- In the Epilogue section “If job has failed”, add the following commands:
cp prompt-template.txt prompt-issue.txt
echo '```xml' >> prompt-issue.txt
cat results.xml >> prompt-issue.txt
echo -e '\n```' >> prompt-issue.txt

[[ ! "$SEMAPHORE_GIT_WORKING_BRANCH" =~ ^copilot/ ]] && \
  gh issue create \
    --assignee "@copilot" \
    --title "Fix failed job: ${SEMAPHORE_JOB_NAME}" \
    -F prompt-issue.txt
This snippet:
- copies your prompt template
- appends the relevant test report (
results.xml) - avoids loops by ignoring branches created by Copilot
- opens a GitHub issue containing everything Copilot needs to begin working
- Repeat this for any block you want Copilot to auto-repair.
How to Follow the Agent Activity
Once your integration is in place, Copilot Agents begin working automatically whenever a pipeline failure occurs. GitHub provides several places to observe what the agent is doing, how far along it is, and whether a fix is ready for review.
Here are the three main places to monitor Copilot Agent activity:
- Copilot Tasks Dashboard
- GitHub Issues in your repository
- GitHub pull requests in your repository
As Copilot works, it continually updates the issue and pull request threads. This makes issues the most detailed, narrative view of the agent’s reasoning and actions.
Final words
GitHub Copilot’s automated reasoning combined with Semaphore’s logic and context unlocks a powerful new development workflow: a CI pipeline that repairs itself.
The setup requires only a few additions to your existing pipeline, but the payoff is substantial:
- Faster feedback loops
- Fewer interruptions for developers
- Consistently healthy builds
- Automated issue creation and PR generation
- A predictable, AI-driven path from failure to fix
As AI-driven tooling becomes more integrated into everyday software development, self-healing pipelines will become more and more common. In fact, if you prefer to use a different agentic AI, we’ve covered Codex and Claude Code on a past post, so be sure to check that out.
Happy building and welcome to the AI-powered era of CI.
The post Self-healing CI with GitHub Copilot and Semaphore appeared first on Semaphore.
]]>Learn how to build self-healing CI pipelines with Semaphore using AI agents that automatically diagnose failures, apply fixes, and open pull requests.
The post AI-Driven CI: Exploring Self-healing Pipelines appeared first on Semaphore.
]]>Continuous Integration (CI) is supposed to give developers fast and reliable feedback. The downside is that when builds fail, the workflow grinds to a halt. But what if your CI pipeline could fix itself?
Self-healing CI is a new pattern that uses AI to automatically diagnose failures, apply code changes, re-run the pipeline, and open a pull request. Instead of getting stuck in repetitive debugging cycles, developers simply review the change, merge it, and move on.
In this guide, we’ll walk through how to build self-healing pipelines using Semaphore, Semaphore’s MCP Server, and an AI code-fixing agent.
How Self-Healing Pipelines Work
At a high level, a self-healing CI setup adds an automated feedback loop on top of your existing pipelines. Instead of stopping at a failure, your CI hands the problem off to an AI agent that attempts to fix the issue, validate the fix, and prepare a pull request.
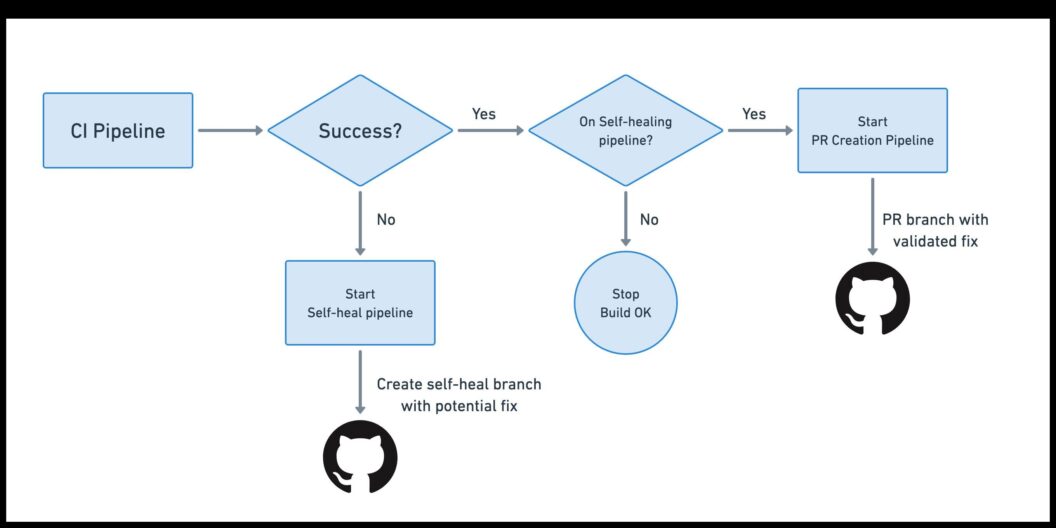
Here’s what the workflow looks like end-to-end:
- Your main CI pipeline runs as usual: you push code, CI starts, and your standard build-and-test pipeline executes. If everything passes, nothing special happens
- When the pipeline fails, a promotion triggers a new “self-heal” pipeline
- The self-heal pipeline spins up an AI agent: The AI agent needs access to your CI logs, job outputs, and workflow metadata through the MCP Server
- The agent applies a fix and pushes a new branch
- CI runs again on the self-heal branch: Since a new branch was pushed, your regular CI pipeline kicks in
- A second promotion opens an automatic pull request: If the rebuilt self-healed branch passes all jobs, a second promotion triggers a dedicated PR-creation pipeline.
- You review and merge the PR
Building a Self-Healing CI Pipeline
Setting up a self-healing CI pipeline in Semaphore involves four major components: enabling the MCP Server, configuring your AI agent, creating the self-healing pipeline, and finally automating pull-request creation.
Prepare the Environment and Tokens
Before implementing anything, you need to give both Semaphore and your AI agent secure access to the systems they’ll interact with.
Enable the Semaphore MCP Server
The MCP Server allows the AI agent to read CI logs, job details, and workflow metadata.
Create Required Tokens and Secrets
You’ll need three secrets:
- Semaphore API Token: stored as
semaphore-mcp → SEMAPHORE_API_TOKEN - GitHub Personal Access Token (Classic) with repository write and PR permissions. Stored as
github-pat → GITHUB_TOKEN - AI Agent API Key (e.g., OpenAI): Stored as
openai-api → OPENAI_API_KEY
Add AI Agent Configuration to Your Repository
Next, create a small configuration workspace in your repo that tells the AI agent how to behave.
Inside selfheal/codex/config.toml, specify:
- Full-auto mode
- Trusted workspace
- Connection details for Semaphore’s MCP Server
- The environment variable that holds the MCP server token
The complete config file is as follows:
full-auto = true
bypass-approvals = true
bypass-sandbox = true
trusted-workspace = true

[mcp_servers.semaphore]
url = "https://mcp.semaphoreci.com/mcp"
bearer_token_env_var = "SEMAPHORE_API_TOKEN"
startup_timeout_sec = 30
tool_timeout_sec = 300
Prompt Template
Create selfheal/prompt-template.txt with instructions for the agent:
- Analyze the failing pipeline
- Inspect all failed jobs
- Apply fixes
- Write a one-line summary in
commit-message.txt
This template becomes the core instruction set for the automated debugging workflow.
Find out why the Semaphore in the following pipeline has failed and implement a fix. Analyze all the jobs that have failed and fix all the errors one at a time.

Organization ID: $SEMAPHORE_ORGANIZATION_ID
Project ID: $SEMAPHORE_PROJECT_ID
Pipeline ID: $SEMAPHORE_PIPELINE_ID
Workflow ID: $SEMAPHORE_WORKFLOW_ID

When done, create a file called `commit-message.txt` with a one-line summary of changes suitable for a Git commit message.
Commit these files so they’re accessible to your CI environment.
Build the Self-Healing Pipeline
Now you can implement the pipeline that performs the automated repair. Add a promotion to your main CI pipeline with a rule such as:
result = 'failed' AND branch !~ '^selfheal-.*'This ensures the self-heal pipeline runs only when the main CI fails (and avoids loops by excluding previously generated selfheal branches).
Make the Repo Writable & Create the Branch
In the self-heal pipeline’s first block, configure Git:
- Check out the repo
- Set Git user/email
- Construct a branch like
selfheal-<git-sha> - Rewrite
originusing your GitHub token so CI can push commits
These steps can be accomplished with the following commands:
export SELFHEAL_BRANCH=selfheal-${SEMAPHORE_GIT_SHA}
checkout
git config --global user.email "[email protected]"
git config --global user.name "Semaphore CI"
git remote set-url origin https://$GITHUB_TOKEN:[email protected]/${SEMAPHORE_GIT_REPO_SLUG}.git
git checkout -b "$SELFHEAL_BRANCH"
Run the AI Agent and Commit the Fix
The job steps:
- Copy the Codex config into the agent’s expected location
- Install the Codex CLI
- Authenticate using your AI key
- Run the agent with the prompt template (using
envsubstto insert pipeline IDs) - Cache the generated commit message
- Commit all changes
- Push the new branch to GitHub
Which can be done with these commands:
mkdir -p $HOME/.codex
cp selfheal/codex/config.toml $HOME/.codex
npm install -g @openai/codex
printenv OPENAI_API_KEY | codex login --with-api-key
codex exec --dangerously-bypass-approvals-and-sandbox "$(envsubst < selfheal/prompt-template.txt)"
mv commit-message.txt /tmp
cache store commit-message-$SELFHEAL_BRANCH /tmp/commit-message.txt
git add -A
git commit -m "selfheal CI: $(cat /tmp/commit-message.txt)"
git push origin "$SELFHEAL_BRANCH"
Pushing triggers a new CI run on the self-heal branch.
Create the Pull-Request Pipeline
Once the self-heal branch’s CI run passes, you want to automatically open a pull request. Add a Second Promotion and use a rule such as:
result = 'passed' AND branch =~ '^selfheal-.*'This ensures the PR pipeline only runs after a successful, AI-generated fix.
Restore State and Prepare for PR Creation
In the pipeline’s job:
- Check out the self-heal branch
- Restore the cached commit message
- Configure Git for write access
- Use GitHub CLI to open a PR
gh pr create \
  --base master \
  --title "Selfheal CI: $(cat /tmp/commit-message.txt)" \
  --body "PR created automatically by the self-healing pipeline."
After completing these steps, your CI system becomes self-healing. Developers only need to review and merge the resulting PR.
Conclusion
Self-healing CI pipelines aren’t about replacing developers. They eliminate the repetitive, low-value work that slows teams down. When your CI can diagnose failures, apply fixes, rerun tests, and open a pull request automatically, your team spends less time chasing flaky tests and environment quirks, and more time shipping meaningful features.
By offloading log-digging and routine debugging to an AI agent, you gain:
- Reduced CI toil: fewer manual retries and less context switching
- Higher developer productivity: more focus on product work
- Faster delivery: issues resolved automatically, sometimes before anyone notices
- Consistent fixes: the agent applies the same repeatable, reliable process every time
Self-healing CI is a powerful upgrade to any modern development workflow. And, once you experience it, you’ll never want to go back.
Thank you for reading, and happy building!
The post AI-Driven CI: Exploring Self-healing Pipelines appeared first on Semaphore.
]]>Jonathan Reimer shares insights on open source startups, developer go-to-market, ecosystem trends, and how AI is reshaping software.
The post Jonathan Reimer on Open Source, Startups, and AI appeared first on Semaphore.
]]>In this episode of Semaphore Uncut, we chat with Jonathan Reimer—founder of Crowd.dev, long-time open source startup operator, and now VP of Outbound Products at the Linux Foundation.
Jonathan shares his journey from building a data platform used by hundreds of developer-first companies, to joining the Linux Foundation through acquisition, and his latest focus: how open source business models, ecosystem dynamics, and rapidly advancing AI tooling are reshaping developer workflows—and the future of software delivery.
Disclaimer: This interview was recorded in May 2025.
From Open Source Startups to Crowd.dev
Jonathan has spent his entire career inside open source companies. Four years ago, he founded Crowd.dev, a platform built around a challenge nearly every OSS startup faces:
“Developers adopt your project bottom-up, but you often have no idea who is using it or which companies are evaluating it.”
Crowd.dev unified signals across the entire developer ecosystem:
- GitHub stars, issues, and contributors
- Twitter/X and Reddit engagement
- Newsletter and community activity
- CRM and product usage data
By consolidating these touchpoints, teams could finally understand which accounts were showing real intent, where community traction was forming, and when to trigger sales outreach.
This visibility is essential for dev-first PLG motions—especially when the first “user” is often a developer inside a Fortune 500 company.
Joining the Linux Foundation
The Linux Foundation quickly became Crowd.dev’s largest customer. With 1,000+ open source projects across 60+ sub-foundations, they needed deeper insight into:
- Who is engaging with each project
- Which companies are participating
- How fast each ecosystem is growing
Jonathan explains:
“Rolling this out across the Linux Foundation meant dealing with enormous data volumes and technical complexity. At some point it became clear the product had to live inside the Foundation.”
Crowd.dev was acquired a year ago, and Jonathan now leads outbound products across the Linux Foundation’s broad OSS landscape—from CNCF to new AI & Data initiatives.
The Three Types of Open Source Companies
After interviewing 400–500 founders, Jonathan sees open source startups falling into three categories:
1. Hobby Projects that Become Businesses
A developer builds something useful, it blows up, and only later becomes a company.
2. Strategic OSS Companies
Founders deliberately target markets to commoditize—an approach that accelerated around 2018–2019.
3. Ecosystem Builders
Teams build proprietary services on top of major OSS platforms (like Kubernetes) where the underlying project is maintained elsewhere (often by Big Tech).
Each category has success stories—and graveyards. Kubernetes, for example, spawned hundreds of startups, but many struggled as cloud providers “featurized” their offerings and commoditized entire product lines.
What Metrics Actually Matter?
GitHub stars? Helpful but misleading.
“Stars are intent signals—but they’re still a vanity metric.”
Instead, Jonathan recommends tracking Google Search Volume for your project’s name:
- Easy to measure
- Difficult to game
- Strongly correlated with real adoption
Once a project reaches ~100–200 monthly searches, the curve tends to map to genuine community growth.
When Does Open Source Make Business Sense?
Jonathan gives founders two critical “checkmarks”:
1. A Large Existing Market
Open source works best when competing with established, high-cost tools—not when creating categories from scratch.
2. Developers Must Be the Primary User
If your buyer is a marketer, salesperson, or operations team, open source loses many of its distribution advantages.
Developer-first companies, however, have a clear monetization path:
- Managed SaaS
- Enterprise support
- Consulting
- Multi-tenant hosting
- Compliance & risk management
“Open source gets you into the building. Developers will bring your product into Fortune 500 companies.”
The Open Source + AI Intersection
Jonathan is still forming his conclusions—but he sees both opportunity and risk.
On one side, AI may make it easier for teams to build internal tools that replace lightweight OSS solutions. On the other, LLMs are trained heavily on open source code, and AI dramatically expands the number of people who can build software:
“We used to have 20–25 million developers. I wouldn’t be surprised if we’re heading toward 100 million people writing software with AI.”
AI is already accelerating open source activity: simple bug fixes, issue triage, and doc updates are increasingly automated. Complex systems (like the Linux kernel) remain far beyond current capabilities—but not forever.
Proprietary Models vs Open Source Models
Jonathan’s prediction is bold:
Open source AI will win at the model layer.
Why?
- LLMs (e.g., DeepSeek, Llama) are rapidly commoditizing
- Switching between models is trivial
- Prices—and margins—are falling fast
- Real value moves to the application and data layers
“The model layer is being commoditized. The value will be in proprietary data, customer access, and applications.”
Companies like OpenAI and Anthropic will remain strong due to enterprise distribution, but widespread adoption will favor accessible OSS models.
And hosting?
Running models on-prem or even at home is already common—something unimaginable just a year ago.
Darko recalls a moment:
Reviewing their full codebase with an LLM used to cost $7–8k. Now it’s within reach—or can be run locally.
Follow Jonathan Reimer
🔗 Website: https://rymer.me
🐦 Twitter/X: @jonathimer
💼 LinkedIn: Jonathan Reimer
The post Jonathan Reimer on Open Source, Startups, and AI appeared first on Semaphore.
]]>Semaphore’s MCP Server lets AI agents and IDEs access rich CI/CD context to explain failures, summarize pipelines, and suggest fixes.
The post AI-Driven Development: Introducing Semaphore’s MCP Server appeared first on Semaphore.
]]>We’re excited to introduce the Semaphore MCP Server, a new way for AI agents and IDE copilots to access rich, structured data about your builds. By exposing pipelines, jobs, and logs through the Model Context Protocol, the server gives assistants the context they need to explain failures, summarize project setups, and recommend fixes without digging through the UI.
Important: Semaphore’s MCP Server is free for all users but disabled by default. To enable it for your organization, email [email protected] and we’ll switch it on.
Why Model Context Protocol matters for CI/CD
MCP standardizes how AI models communicate with external systems. An MCP server acts as a bridge between the assistant and your infrastructure, exposing data and scoped actions through declared tools and resources.
With MCP, agents can fetch the exact information they need, like workflow histories or failing job logs.

Some examples of what you can now do with the MCP Server:
- Summarize build or test failures
- Explain why a pipeline failed and highlight the step that needs attention
- Describe what a given pipeline does so new contributors can ramp up quickly
- Propose or even implement fixes in the codebase with full CI context
Semaphore’s MCP Server
Semaphore’s implementation focuses on observability first. This initial release ships as a read-only interface so teams can trial the experience safely while we collect feedback. Under the hood, the server aggregates the same metadata surfaced in the UI and exposes it through a curated toolset:
organizations_list,projects_list, andprojects_searchfor high-level discoveryworkflows_search,pipelines_list, andpipeline_jobsto inspect activity chronologicallyjobs_describeandjobs_logsto dive into agent details and log outputechoto smoke-test connectivity from your client
Keeping the scope observational lets you grant access broadly without worrying about write operations. As adoption grows, we’ll layer in more capabilities based on your feedback.
Availability and access
Authentication happens via the same API tokens you already use:
- Use a Personal API Token for individual access
- Or create a Service Account and use the associated API token
Then, you only have to point your MCP client to the official Semaphore endpoint: https://mcp.semaphoreci.com/mcp.
Configure your AI agent
The server is compatible with any MCP-aware client. Below are quick-starts for the three we test most often. If you run into issues, see the full MCP guide or reach out to support.
Claude Code
Claude Code is configured via the command line:
- Export your API token:
export SEMAPHORE_API_TOKEN=my-token- Register the Semaphore MCP endpoint:
claude mcp add semaphore https://mcp.semaphoreci.com/mcp \
  --scope user --transport http \
--header "Authorization: Bearer $SEMAPHORE_API_TOKEN"- Restart Claude Code, so the new server loads.
OpenAI’s Codex
For Codex, the procedure is similar:
- Open
$HOME/.codex/config.tomland add:
[mcp_servers.semaphore]
url = "https://mcp.semaphoreci.com/mcp"
bearer_token_env_var = "SEMAPHORE_API_TOKEN"
startup_timeout_sec = 30
tool_timeout_sec = 300
Note that
bearer_token_env_varpoints to the name of the shell variable that stores your token, not the token itself.
- Export the token in your shell (and optionally in your rc file):
export SEMAPHORE_API_TOKEN=my-token- Launch Codex normally. It will initialize the MCP server during startup.
VS Code (Codex Extension)
- Install the Codex VS Code extension.
- Press the Gear icon → MCP settings → Open config.toml). Add the MCP configuration:
[mcp_servers.semaphore]
url = "https://mcp.semaphoreci.com/mcp"
bearer_token_env_var = "SEMAPHORE_API_TOKEN"
startup_timeout_sec = 30
tool_timeout_sec = 300- Export
SEMAPHORE_API_TOKENin the shell session you’ll use to start VS Code:
export SEMAPHORE_API_TOKEN=my-token
code path/to/projectImportant: Due to extension limitations, VS Code must be launched from the same shell that has the environment variable with the token. Starting VS Code in any other way causes connection errors.
Example prompts
Use these as conversation starters once the server is connected. Some actions assume your agent already has local repo access.
| Goal | Prompt |
|---|---|
| Discover accessible orgs | “List the Semaphore organizations you can reach.” |
| Cache IDs for faster follow-ups | “Find the current Semaphore org and project IDs and store them in AGENTS.md.” |
| Understand a pipeline | “Describe what the latest pipeline for this repo does on Semaphore.” |
| Troubleshoot failing tests | “Help me figure out why the most recent workflow failed its tests on Semaphore.” |
| Inspect build logs | “Show me the logs for the build job in the latest workflow.” |
| Summarize a failure | “Explain why my last deployment failed and suggest next steps.” |
What’s next
Remember, Semaphore’s MCP Server is free for all customers but disabled by default. To enable it for your organization, email [email protected] and we’ll switch it on for you.
We’re iterating quickly on this integration. Please send feedback, feature requests, or issues to the Semaphore repository or chat with us on the Discord server. We’re listening and eager to help your agents work smarter on Semaphore.
Thank you for reading, and happy building!
The post AI-Driven Development: Introducing Semaphore’s MCP Server appeared first on Semaphore.
]]>Learn how to build a simple MCP Server with Python. This guide covers everything you need to bring AI-powered automation to your CI/CD.
The post Let’s Build an MCP Server appeared first on Semaphore.
]]>You’ve probably heard about MCP Servers. You might even be using quite a few of them with your AI Agents or IDEs. But have you ever built one? It takes surprisingly little code to implement a functional MCP Server. So, let’s build an MCP Server.
To learn more, listen to this Technical Tips podcast episode or watch the video below. Enjoy!
By the end of this post, you’ll understand:
- How MCP servers communicate with AI clients.
- How to connect an MCP server to Semaphore’s API.
- And how to integrate it with tools like OpenAI’s Codex to make your continuous integration setup conversational.
Wrapping an API with an MCP Server
We’ll need a real-world API to work with. For this post, I’ll use Semaphore’s public API, which exposes virtually every aspect of your CI/CD workflows. That means our MCP server can query real build data, list projects, or even diagnose failed runs, all through a few HTTP calls.
To interact with the Semaphore API, we need authentication. The easiest way is to create a Service Account with admin access to your projects.

Before building the MCP server, it’s a good idea to test that our API connection works. You can do that with a simple curl command.
curl -i -H "Authorization: Token ${SEMAPHORE_API_TOKEN}" \
  "https://${my_org}.semaphoreci.com/api/v1alpha/projects"
We’ll receive a JSON response like this:
[
  {
    "metadata": {
      "owner_id": "f5a943a2-6606-4b4e-848f-eb746d9bcf03",
      "org_id": "f580f012-1b80-437f-acaf-be038f827270",
      "name": "m01.devops.training-python",
      "id": "9e1cba05-6203-4398-bf0b-e22a78fd9b73",
      "description": ""
    },
    "kind": "Project",
    "apiVersion": "v1alpha"
    "spec": {
      "visibility": "private",
      "tasks": [],
      "schedulers": [],
      "repository": {
        "whitelist": {
          "tags": [],
          "branches": []
        },
        "url": "[email protected]:TomFern/m01.devops.training-python.git",
        "status": {
          "pipeline_files": [
            {
              "path": ".semaphore/semaphore.yml",
              "level": "pipeline"
            }
          ]
        },
        "run_on": [
          "tags",
          "branches",
          "draft_pull_requests"
        ],
        "pipeline_file": ".semaphore/semaphore.yml",
        "owner": "TomFern",
        "name": "m01.devops.training-python",
        "integration_type": "github_app",
        "forked_pull_requests": {
          "allowed_secrets": [],
          "allowed_contributors": []
        }
      }
    }
  },
To keep things simple, let’s focus only on the project name, which can be found under the key metadata.name for each item in the list.
Initializing the Project
Let’s start fresh by creating a new Python project.
We’ll call it semaphore-mcp:
uv init semaphore-mcpThis creates a basic Python project structure with a pyproject.toml file and a new directory for your code.
Next, navigate into the project folder: cd semaphore-mcp
To keep our dependencies isolated, we’ll create a virtual environment using uv:
uv venv
source .venv/bin/activate
Our MCP server will only need a couple of dependencies:
httpx: a fast, modern HTTP client for Python.mcp[cli]: a command-line and runtime toolkit for building MCP servers.
Install them both using uv:
uv add "mcp[cli]" httpx
That’s it. With this minimal setup, we’re ready to start writing the code for our MCP server.
Building the MCP Server
With our environment ready, it’s time to build the heart of the MCP Server. We’ll do everything in a single file: main.py
We’ll start by importing the dependencies we need:
import os
import httpx
from mcp.server.fastmcp import FastMCP
Next, we’ll instantiate the MCP server:
mcp = MCP("semaphore")Now comes the core functionality. Tools are the functions that the AI client can call. We’ll define one called list_projects, which returns the names of all projects in your Semaphore organization. Tools in FastMCP are decorated with @mcp.tool:
@mcp.tool()
def list_projects() -> list[dict[str, str]]:
    token = os.environ["SEMAPHORE_API_TOKEN"]
    org = os.environ["SEMAPHORE_ORG"]
    url = f"https://{org}.semaphoreci.com/api/v1alpha/projects"
    response = httpx.get(url, headers={"Authorization": f"Token {token}"}, timeout=10)
    return [{"name": item["metadata"]["name"]} for item in response.json()]
In this function:
- We fetch the
SEMAPHORE_API_TOKENandSEMAPHORE_ORGfrom the environment. - We make an authenticated GET request to Semaphore’s API.
- The function returns a list of dictionaries containing project names; a simple but structured format that the AI can easily interpret.
Finally, we’ll start the MCP server and use stdio (standard input/output) as the communication transport.
def main() -> None:
    mcp.run(transport="stdio")


if __name__ == "__main__":
    main()
Here’s the complete main.py:
import os

import httpx
from mcp.server.fastmcp import FastMCP

mcp = FastMCP("semaphore")

@mcp.tool()
def list_projects() -> list[dict[str, str]]:
    token = os.environ["SEMAPHORE_API_TOKEN"]
    org = os.environ["SEMAPHORE_ORG"]
    url = f"https://{org}.semaphoreci.com/api/v1alpha/projects"
    response = httpx.get(url, headers={"Authorization": f"Token {token}"}, timeout=10)
    return [{"name": item["metadata"]["name"]} for item in response.json()]


def main() -> None:
    mcp.run(transport="stdio")


if __name__ == "__main__":
    main()
Testing the MCP Server
Now that our MCP server is built and ready, it’s time to test it. The MCP Inspector is an interactive debugger and tester for MCP Servers. It allows us to call tools, view schemas, and inspect responses.
You can launch the inspector directly from your terminal using npx.
npx @modelcontextprotocol/inspector \
   uv \
   --directory $PWD \
   run main.py
Once launched, the Inspector will open in your browser with a dashboard for your MCP server.
Inside the Inspector:
- You’ll see your server listed under Connections.
- Go to the Tools tab — your
list_projectsfunction will appear there automatically. - Click on it, and you’ll see:
- The function’s name (
list_projects). - Its description, extracted from the docstring.
- The output schema, generated from the type hints in your code.
- The function’s name (
This auto-discovery is one of the best features of FastMCP, as you don’t have to manually define JSON schemas. Everything is inferred directly from your Python function.
To run the tool, ensure the SEMAPHORE_API_TOKEN and SEMAPHORE_ORG environment variables are defined on the left sidebar. Then press Connect. Go to the Tools tab and retrieve the list of tools.
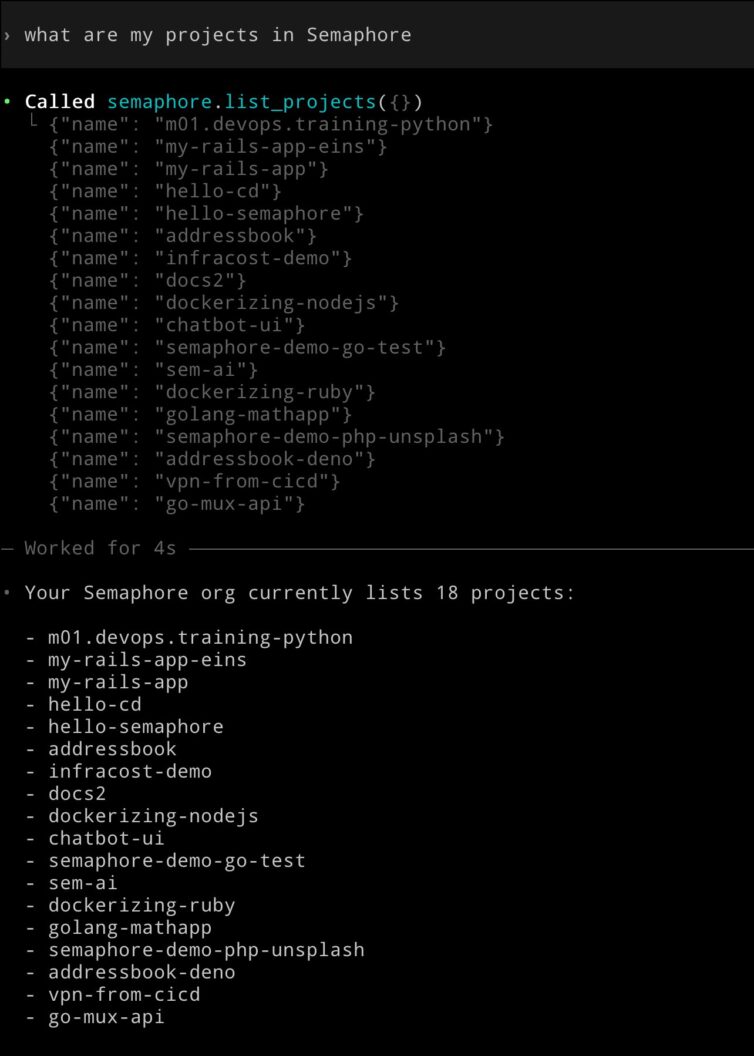
Use Run Tool** to execute the list_projects function. If everything is configured correctly, the Inspector will display a JSON array containing all your Semaphore projects, like this:
[
  {"name": "hello-semaphore"},
  {"name": "dockerizing-ruby"},
  {"name": "golang-mathapp"},
  {"name": "addressbook-deno"}
]
Integrating with Codex
Now that our MCP server is running smoothly, let’s connect it to Codex.
Codex uses a simple command-line interface for managing MCP servers.
To register your Semaphore MCP server, ensure the SEMAPHORE_API_TOKEN and SEMAPHORE_ORG variables are set and run:
codex mcp add semaphore \
  --env SEMAPHORE_API_TOKEN=$SEMAPHORE_API_TOKEN \
  --env SEMAPHORE_ORG=$SEMAPHORE_ORG \
  -- uv --directory $PWD run main.py
To confirm that your MCP server has been registered, run:
codex mcp listNow comes the fun part: open Codex and ask it something like: “List all my Semaphore projects”. You’ll see the same output as before, but this time it’s coming directly through Codex’s conversational interface.
This is a simple example, but imagine extending the MCP Server to fully control Semaphore. You would be able to ask things such as:
- “Why did my last build fail?”
- “Show me the logs for the deploy job.”
- “Add a test step to my pipeline and rerun it.”
Semaphore MCP Server Coming Soon
The good news is that we don’t have to extend this MCP Server because an official MCP server for Semaphore is currently in development and will soon be generally available. Initially, this version will be read-only and enabled for organizations expressing interest in trying out this new feature. And we expect to make it generally available to all organizations in a very short time.
Conclusion
With only a few lines of Python, you’ve built a bridge between your CI/CD system and an AI assistant. It is capable of understanding, retrieving, and acting on real project data. MCP and AI integrations are ushering in a new era where DevOps becomes conversational and testing is AI-driven.
Thank you for reading, and happy building!
The post Let’s Build an MCP Server appeared first on Semaphore.
]]>Touted as the “USB-C for AI”, MCP connects LLMs and AIs to external tools using a simple, open standard built on JSON-RPC.
The post What is MCP Really? appeared first on Semaphore.
]]>The Model Context Protocol (MCP) has been described as “the USB-C for AI”. It’s a fitting analogy, but what does it really mean? What is MCP?
Large language models (LLMs) are incredibly capable, but they only know what they know. Once trained, an LLM can’t access real-time information or specialized systems until it connects to external tools.
MCP provides a communication protocol that lets models like GPT or Claude interact with any compatible tool or service. Instead of relying on proprietary APIs or one-off integrations, MCP introduces a shared language for interaction between AIs (as clients) and software (as servers).
How the MCP Works
At its core, MCP is a simple client–server model. The large language model acts as the client, while a server provides one or more tools the AI can use. Communication between the two happens through JSON-RPC.
During initialization, the AI and server negotiate capabilities.
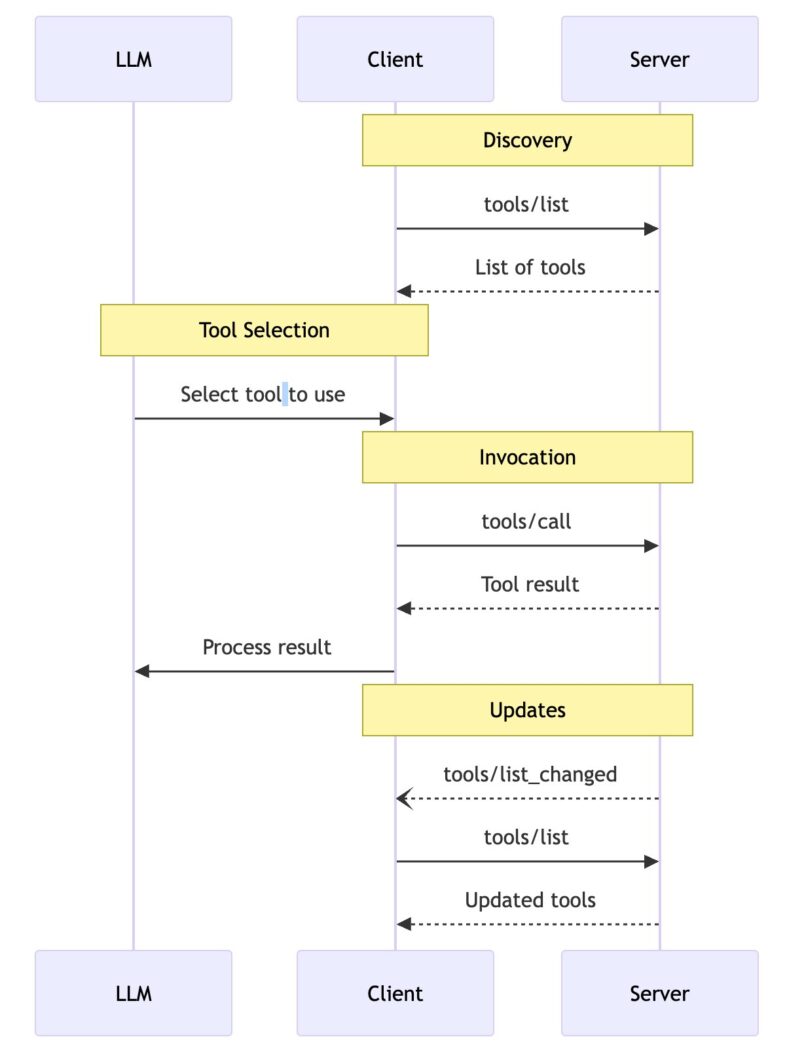
Then the AI sends a client a tools/list request.
{
  "jsonrpc": "2.0",
  "id": 1,
  "method": "tools/list",
  "params": {
    "cursor": "optional-cursor-value"
  }
}
And the server responds with a manifest of available tools:
{
  "jsonrpc": "2.0",
  "id": 1,
  "result": {
    "tools": [
      {
        "name": "get_weather",
        "description": "Get current weather information for a location",
        "inputSchema": {
          "type": "object",
          "properties": {
            "location": {
              "type": "string",
              "description": "City name or zip code"
            }
          },
          "required": ["location"]
        }
      }
    ],
    "nextCursor": "next-page-cursor"
  }
}
The AI now knows what tools or functions are available and picks one for a user request. So, in our example, the AI would call the get_weather tool.
{
  "jsonrpc": "2.0",
  "id": 2,
  "method": "tools/call",
  "params": {
    "name": "get_weather",
    "arguments": {
      "location": "Lisbon"
    }
  }
}
And the MCP server responds with structured output, in this case, how’s the weather in Lisbon:
{
  "jsonrpc": "2.0",
  "id": 2,
  "result": {
    "content": [
      {
        "type": "text",
        "text": "Current weather in Lisbon:\nTemperature: 32°C\nConditions: Partly cloudy"
      }
    ],
    "isError": false
  }
}
Local vs Remote MCP Servers
The easiest way to implement the MCP server is to run it on the same host as the client. For example, if I’m using OpenAI Codex or Claude Desktop, the AI can spawn an MCP server locally and communicate over standard input and output (stdio).
For more complex setups, the MCP allows communication over HTTP and provides mechanisms for authentication and authorization. These servers can require credentials, API keys, or tokens, depending on how sensitive their capabilities are.
The State of the Standard
MCP is still an emerging standard. It was introduced in 2024 as an open specification. MCP is being developed collaboratively by several players in the AI ecosystem.
The initial specification was published at modelcontextprotocol.info, and the work is happening in the open with input from AI companies, open-source developers, and infrastructure providers.
Conclusion
MCP represents a quiet but fundamental shift in how AI systems interact with the world. It offers a shared, open standard; a common language that any model and any tool can use to talk to each other.
For developers, this means fewer one-off connectors and more reusable, interoperable systems. For users, it means AI assistants that can reach beyond their training data and tap into live information, files, or applications with precision and context.
Thanks for reading, and happy building!
The post What is MCP Really? appeared first on Semaphore.
]]>Brian Douglas shares how AI tooling, open source, and Kubernetes are redefining developer workflows and software delivery.
The post Brian Douglas: AI Tooling, Open Source, and the Future of Developer Workflows appeared first on Semaphore.
]]>In this episode of Semaphore Uncut, we chat with Brian Douglas—former GitHub developer advocate, founder of OpenSauced, and now part of the Linux Foundation’s CNCF ecosystem team.
Brian shares his journey from helping developers contribute to open source more effectively, to leading a startup acquired by the Linux Foundation, and his latest focus: how AI tooling and open source infrastructure are reshaping developer workflows—and, ultimately, the future of software delivery.
From GitHub to OpenSauced
Brian began his career as a software engineer and joined GitHub’s developer relations team, helping shape the early community of maintainers and contributors.
While there, he noticed a problem: developers contributing to open source lacked a clear way to track their pull requests across projects.
“I wanted a CRM for pull requests—a single place to see where my contributions were, what stage they were in, and what was missing.”
That idea became OpenSauced, a platform offering developer insights into open source projects. After several years of building and serving enterprise clients, OpenSauced was acquired by the Linux Foundation and integrated into the LFX platform, which helps organizations manage and grow open source ecosystems.
Joining the Linux Foundation and CNCF
Now, at the Cloud Native Computing Foundation (CNCF), Brian works on ecosystem and user engagement—connecting enterprises like Apple, Capital One, and J.P. Morgan with open source cloud technologies.
“Our job is to get enterprises not just to consume open source, but to contribute—through code, funding, and sharing case studies.”
For leaders managing modern infrastructure, this is the center of gravity: Kubernetes, ArgoCD, and the rest of the CNCF stack underpin the world’s software delivery systems.
AI Tooling Comes to Infrastructure
Brian sees AI as the next transformative layer on top of open source infrastructure—similar to how CI/CD reshaped delivery pipelines a decade ago.
“Kubernetes is already the substrate for the cloud. The next step is making it the substrate for AI.”
New tools, from K8sGPT (AI-assisted debugging for clusters) to RunAI and SF Compute (GPU scheduling and distributed compute), are extending DevOps patterns into AI infrastructure.
That means engineers will soon deploy AI clusters across regions, manage GPU resources as code, and integrate model evaluation directly into CI/CD pipelines.
“We’re moving from calling APIs to running our own small, fine-tuned models. That’s where cost control and performance live.”
AI Engineers and the New Workflow
Brian describes a growing divide—and eventual convergence—between traditional ML practitioners and the new generation of AI engineers:
- ML engineers: deep in data science, training, and evaluation.
- AI engineers: focused on shipping features quickly with APIs and frameworks.
Over time, these roles will merge, as infrastructure becomes the bridge between experimentation and production.
“Think of it like DevOps for AI—teams deploying and monitoring models, not just writing prompts.”
From Copilot to Autopilot
Brian compares today’s developers to airline pilots:
“Pilots don’t do barrel rolls—they supervise automation. Engineers will soon do the same.”
He cautions against what he calls “vibe coding”—blindly accepting AI-generated code without understanding it.
The future developer’s skill lies in:
- Designing guardrails for AI assistants (rules, style guides, system prompts).
- Running AI evals in CI to prevent regressions.
- Understanding why a fix works—not just letting the model “patch and go.”
These new workflows will raise the engineering floor: smaller teams, fewer repetitive tasks, more focus on architecture, testing, and governance.
Open Source, Context, and “Policy-as-Prompt”
One of Brian’s recurring themes is context. Whether in open source or enterprise teams, knowledge needs to be encodedinto the tools developers use.
He’s experimenting with policy-as-prompt—embedding organizational rules, API versions, and style conventions into the assistant’s context window.
“Instead of Post-it notes next to your merge button, you build the rules into your AI copilot.”
Paired with retrieval-augmented generation (RAG), this approach lets teams query their entire history of projects and incidents:
“Have we solved this before? Who fixed it? Which version broke it?”
The Human Side of Open Source + AI
Despite the automation narrative, Brian believes human creativity and curiosity will remain central to engineering culture.
“There’ll always be people who love building by hand—just like vinyl records never went away.”
The opportunity for leaders is to build teams that supervise automation effectively: crafting standards, encoding institutional knowledge, and using open source as a multiplier for innovation.
Looking Ahead
For Brian, the next decade of engineering looks less like writing code and more like orchestrating systems that write, test, and deploy code—all running on open infrastructure.
“Today you’re a cloud engineer. Tomorrow you’re an AI-enabled cloud engineer. That’s where we’re headed.”
As AI merges with CI/CD, the most successful teams will be those who:
- Treat AI evals like tests and prompts like code.
- Run AI workflows on Kubernetes for scale and reliability.
- Keep humans in the loop for context, ethics, and judgment.
Follow Brian Douglas
🔗 LinkedIn
🌐 GitHub – bdougie
📬 Website
The post Brian Douglas: AI Tooling, Open Source, and the Future of Developer Workflows appeared first on Semaphore.
]]>Build your own AI code review tool in CI with a few lines of Bash and an API key. No expensive tools required and you are in full control.
The post DIY AI Code Review appeared first on Semaphore.
]]>You don’t need to spend a dime on fancy AI code review platforms to get powerful results.
With just a few lines of Bash and access to an AI API, you can build your own automated reviewer that runs right inside your CI pipeline.
You can find functional example code in the following demo repository:
ChatGPT Wrappers Everywhere
Most commercial AI review tools are just wrapping the same API calls you can make yourself — but they add price tags, dashboards, and restrictions you might not even need. When you roll your own setup, you stay in control:
- You decide what’s analyzed and how it’s reported.
- You know exactly where your code and data go.
- You can customize the AI prompts, rules, and thresholds to match your workflow.
DYI AI Review Overview
Let’s break down how an AI reviewer actually works under the hood. It’s simple, just three moving parts connected by your CI pipeline.
- File selection: choose the files to analyze. Usually changed files in a PR.
- AI Review: send changed files to the AI API endpoint with a suitable prompt.
- Results parsing: read the results and take some action. For example, log them in a dashboard for further review or fail the CI pipeline if there are just too many errors.
Step 1: File Selection
Your AI reviewer doesn’t need to analyze the entire codebase. We can only focus on what changed in the PR.
In most CIs you can use Git to grab the list of modified files in a pull request.
For example, on Semaphore, you can do it in one line, thanks to SEMAPHORE_GIT_COMMIT_RANGE:
git diff --name-only "$SEMAPHORE_GIT_COMMIT_RANGE"
This command outputs the paths of every file modified between the base and head commits of the PR or the push that triggered the pipeline. You can then filter them by extension (*.js, *.py, etc.) or directory (e.g. src/) before sending them to the AI.
Step 2: Ask Your AI
Next, send those changed files to your favorite AI model like OpenAI or Anthropic.
A few lines of Bash and curl are enough. For example for OpenAI:
curl https://api.openai.com/v1/responses \
  -H "Authorization: Bearer $OPENAI_API_KEY" \
  -H "Content-Type: application/json" \
  -d '{
    "model": "gpt-4o-mini-2024-07-18",
    "input": [
      {"role": "system","content":[{"type":"input_text","text":"You are a senior code reviewer. Respond in JUnit XML."}]},
      {"role": "user","content":[{"type":"input_text","text":"Review these files:"}]}
    ],
    "temperature": 0
  }'
You can tune the prompt to match your priorities. For instance: security, performance, maintainability, documentation, or anything else. Just make sure to request a structured output, like JSON or JUnit XML, so you can parse it automatically in the next step.
Step 3: Process the Result
Once the AI sends its response, parse it in CI to make the output actionable.
For example, if the AI returns JUnit XML, you can use Semaphore’s built-in test reports dashboard to visualize findings.
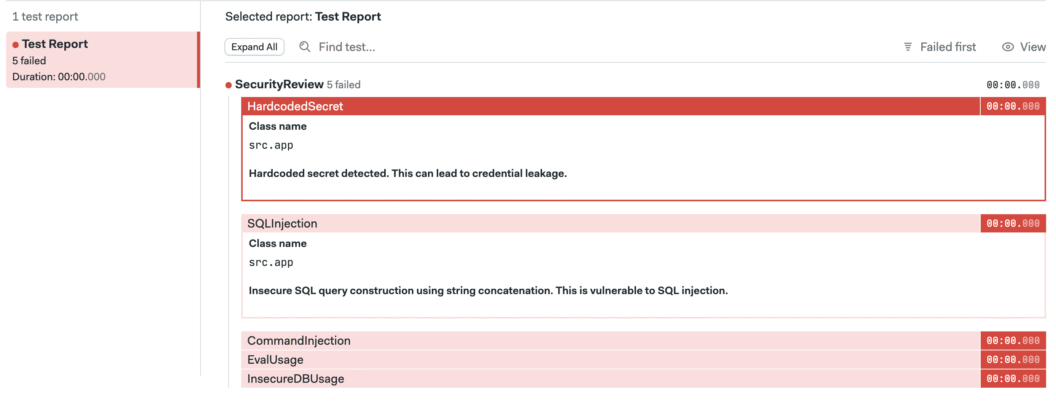
Alternatively, you can even add a threshold rule that fails the pipeline if too many issues are found.
Next Steps
Building your own AI code review can be fun, practical, and a low-cost way to bring intelligent automation into your CI pipeline. You decide what’s analyzed, how the feedback looks, and what happens when issues are found. Think of this as the start of the journey. It’ll will take some time and work to get to point you’re satisfied with the review, but it will be worth it.
If you’re ready to try it, check out the example repository linked below as a starting point for your experiments.
Thank you for reading and happy building!
The post DIY AI Code Review appeared first on Semaphore.
]]>